Sandarac oil varnish was the so-called “vernis liquida” of the Italian Renaissance-era tempera and oil painting technique; and many, many centuries before.
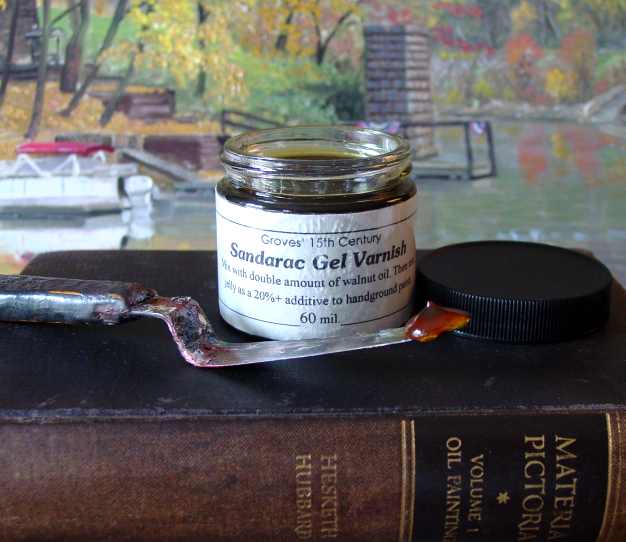
Again I enter the realm of unknown gelling varnishes and their resulting media. This particular gelling varnish, based on sandarac resin, is a concentrated heavy gelatinous liquid. It comes in a wide-mouthed glass jar. By itself, this varnish is much too strong to be utilized in oil painting. To create the actual painting medium, you simply mix the Sandarac Gel Varnish with two parts of raw oil using the palette knife. A soft supple painting "jelly" is the result. [Note: while the conjured 'jelly' can be stored in another container, try not to mix up more medium than what will be used in a one or two day period, as the stored jelly may lose some of its perfect painting character. One should consider fresh medium to be as essential to fine technique as fresh oil paint.] Any regular painting oil may be used but I've found unrefined walnut oil to be best. Use this resulting soft jelly medium to trim your paint and use as a couch for all manner of manipulations. If you use this medium with the typical Dutch layered manner of the 1400's-1500's, the work will dry with a glassy surface, requiring no final varnish.
This gelled sandarac varnish contains a small amount of turpentine and so those individuals who experience reactions to solvents should not consider it.
Oil varnishes and the oil painter
There are too many ways to make oil varnishes. Although most oil varnishes – regardless the resin involved – are quite similar in effect when used as coatings, some versions can be truly eye-opening in their performance within oil painting.
Early on in oil painting history, varnishes were sometimes constructed by the artists, themselves. I have no doubt this offered a route to obtaining certain desirable properties not available to the common coating types of varnish bought from the local color shop.
For example, Georgio Vasari wrote of Van Eyck cooking his own varnish. In the same time as Vasari, Armenini supplied a painting book containing varnish-making recipes. T. Rosello also gave recipes and directions; ditto Borgheni–. Note that all of these writers wrote during the 1500s. It shows off the widespread early practice of artists making their own varnishes. Know that this practice later died off, with most artists simply buying whatever was available from their local color shop. I believe that something became lost to oil painters by this occurrence. [Even earlier, the Strasbourg Manuscript also gave direction for the painter to make varnishes.]
Many today believe oil varnishes are all the same; a certain mind-set has developed where ‘if you’ve tried one, you’ve tried them all’ reigns as the standard philosophy. I used to think that, myself, but I've since found through countless trials that varnishes can be quite different in produced effects with paint and technique. For instance, I made amber varnish literally a hundred different ways before settling on the versions we now offer; and our version is not like the others ‘out there’. The same goes with our copal and other varnishes. In particular, we produce oil varnishes most suitable to oil painters who work in traditional manners. [The underlying basis/ reason for this search and discovery is simple enough: I am, myself, a fastidious oil painter who demands as many properties from an oil varnish as possible; and once I uncover the best varnish, I’ll then share the find with my similarly-minded brethren. ]
Sandarac
Sandarac resin comes from a coniferous tree typical to the North African country of Morocco. A slightly different variety comes from Australia. Both varieties make excellent oil varnishes that are light and clear.
Mayer and Doerner have nothing good to say about Sandarac. They warn the painter not to use it with oil painting; and that it has no purpose. However, and excepting Doerner's commentary regarding use of a spirit-made sandarac varnish, their words show no real familiarity with the golden material.
Frankly, I am impressed with this 'ancient' resin. Next to common pine resins, sandarac enjoys a very long history for use as an ingredient in oil varnish. Unless the correct method is followed, the lightly-colored sandarac resin is actually quite tough to dissolve; especially the Australian sandarac. Then again, if the right procedure is followed, sandarac resin is only slightly more difficult to dissolve into oils than the general European pines.
Sanderac is not unlike Agathis copals in that they share definite characteristics; and, botanically, they are both classed as sandaracopimeric resins – the name, alone, foretelling the brotherhood. It was this similarity to copal that induced me to acquire and study sandarac. I found that this resin had all sorts of traits and could be formulated into a very tough oil varnish– one that could easily provide the early painters with desirable properties. Along the way, I also figured out how to make a gelling varnish with it.
Typically, the old “vernis liquida” involved combining one part of the sandarac resin with up to three parts of linseed or walnut oil. Making the’ vernis’ was fraught with danger as the highly cooked oil and resin was extremely hot ; far above the boiling point of water. Then too, the varnish also became rather deeply red in color, making it unattractive to those artists desiring the lightest agents for their paint-making.
But certain ways of cooking the varnish allowed comparatively better results. By the 1500's, such recipes were being recorded in various European countries, though, it should be kept in mind, these various recipes were likely much more ancient than their earliest-recorded dates.
Once it combines with the oil, sandarac makes for a slow-drying varnish. In fact, the only fast way to induce the basic vernis liquida to dry quickly is to place the varnished object into direct sunlight; in which case, it dries wonderfully fast. This is precisely the olden manner. The early tempera painters loved this varnish as a final coating ; and they always placed their works out in the sun to speed the drying process. It is said they also liked the warm reddish color of the basic vernice liquida.
The first oil painting varnishes...
In that early time before oil painting became popular, that is to say, when tempera reigned supreme as the method of capturing the greatest painted effects of realism, sandarac and pine oil varnishes held the greatest favor.
Eastlake provides us with many historical instances about sandarac. [He says good things about sandarac; though he thought it responsible for a certain oxidized crusty brown covering he observed in the darks of some old Italian oil paintings. Of course, old varnish--especially with long exposure to sunlight and weathering -- can become crusty, even brown; but I cannot think it possible to make such simple conclusions without further evidence. Crustiness also indicates atmosheric attack from moisture. Certain pigments and salts within their makeup attract moisture from the air. For instance, once popular soot-made browns can often be the culprit to such visual manifestations.]
Eastlake also makes a remarkably clear and reasonable background for either Hubert or Jan van Eyck’s tempera varnish being the usual sandarac-based varnish of that long-ago time; indeed, there is little doubt that either sandarac, or the equally common pine-based oil varnish, WAS the likely oil varnish of the day. Coupled with Georgio Vasari’s accounting of the Van Eyck-ian discovery, it would seem plausible that one of the brothers began making the sandarac (or pine) oil-varnish, himself, and with the goal of creating a version that was light but also drying.
As I have noted elsewhere, many today place no real faith in Georgio Vasari’s account of the brothers Van Eyck; and this even though Vasari wrote and obtained his basic information from the Belgian Ministry. [BTW, Eastlake points out many flaws in Vasari’s “lives of the Painters”, too.]
Well, who really knows? The answer being, of course, we cannot know.
Yet, if one follows the story, compares it to other known stories, and further delves into the normal practices coincident to the period ... very interesting things concerning the historically-supposed Van Eyck-ian discovery can be gleaned.
Anyway, and as a point of historical interest, Eastlake (who I can rarely find any disagreement with) produces much historical detail in discerning that the slow-drying sandarac oil varnish was the more likely critter undergoing Van Eyck’s supposed experiments. I followed his line of reasoning and found nothing out of place. [Frankly, as a painter and varnish maker, I’ll easily remark that it was all very impressive. Sad to say, those today who poke Eastlake are quite typically poorly-grounded with varnish and medium-making; AND, nearly needless to say, quite in-experienced with the use of natural resin varnishes in actual painting-practice.]
Yet, curiously, and as those who have cogently read this well-researched book can vouch, Eastlake abruptly ‘jumps ship’ in the middle of his very reasonable and compelling arguments, then and instead, he throws all his further research efforts towards copal and amber oil varnishes.
And so, after putting forth such compelling arguments towards sandarac as the early oil varnish ingredient in tempera and oil painting manners, the resin is dismissed from the realm of his further study.
I believe Eastlake missed something quite valuable by going down another road. Myself, I have found sandarac varnish to be a wonderfully effective tool for use with oil paint.
Sandarac: Lost from the oil painting realm...
The coniferous sandarac and copal are very close 'cousins' when varnish-making matters are considered. Sandarocopimeric acid constitutes the major ingredient of both, especially when we compare the Agathis-type copals to sandarac. Sandarac has always been an expensive resin. With increased trading practices, the Near and Far East began to provide valuable raw materials to European countries. Excellent large clear lumps of Agathic copal (often resembing the prized Baltic amber in physical appearance) would be found in abundance within the Maldive islands near India. Copal resin gained in popularity as a cheaper agent readily available for creating tough and lightly-colored oil varnishes.
And so sandarac went out with the 1600's. It was yet available to craftsmen; but few of these craftsmen were making their own varnishes; especially any varnish involving the skills and terrific heats so necessary to creating decent oil varnishes. Thus, sandarac varnish would come back, now-and-then, but most always as a cold-compounded spirit varnish-- typically constructed using lavender or spike lavender as the solvent for the powdered sandarac (turps cannot allow the dissolution; nor could/can any oil be added in afterwards to the made varnish, as this would immediately pull the dissolved sandarac out of suspension).
[There were other ways to making spirit varnishes, a bit more involved, though. For instance, according to some old 1600's formulae, such a spirit varnish was sometimes made by first dissolving the powdered sandarac into a cooking light pine resin; then subsequently thinning the whole while warm with just about
any available solvent. Turps can/could be utilized in this manner.]
Anyway, sandarac still played a role in varnish-making, though this later use was as a final spirit coating
sought as a tougher substitute for the much softer mastic. In this task, sandarac performed rather well, finding promotion in various artists handbooks written from the 17-1800's.
As a curiosity, I might mention that, just perhaps, van Eyck found the method for making a spirit version utilizing lavender oil with sandarac...and that maybe this spirit varnish was the fast-drying coating he and others might have long sought. Yet we also read by way of the olden manuscripts that spirit varnishes were considered weak in the Northern wetter climes, and that oil varnishes were chosen as coatings for the greater permanence. At this point there is little to offer but much speculation.
Then too, knowing as I do that a spirit sandarac varnish will not combine with oil seems to preclude any consideration of it finding incorporation into the oh-so-perfect medium found by the van Eycks. And so I'll only posit Eastlake's opinion that, no, van Eyck would more likely have sought a faster-drying OIL-in-resin varnish for his favored coating– and the plausible induction of that oil-resin varnish into a novel oil painting technique.
Though, again, this is mere speculation. Who among us today can truly say?
Use of the Sandarac Gel Varnish
Combine it with unrefined walnut oil, using the knife and a small scrap piece of glass. Work the resulting jelly well, until it forms into a soft and consistent gel that does not run with gravity. The slower-drying speed makes this jelly conducive to carefully-constructed works. I prefer it for my finest detailed paintings (though, further along, I will present a demo utilizing it with a sketching technique). Use the jelly to oil-out the passage before beginning to paint or glaze. Or, make up some ‘liquid glass’ by touching some desired color into the jelly; apply it without need of oiling-out, say, as a glaze or scumble atop the under-work.
I adore this jelly medium, for I can work away for two days without fear of drying; then, when needed, I can set the work outside in direct sunlight. In a couple of hours time, the work is dry-to-the-touch, and has an excellent, brilliant appearance, which, so far, seems to last well. This jelly seems perfectly suited to the early Dutch manner; and, agreeing with Eastlake here, as sandarac varnish was very likely the first choice varnish-medium of many Italians before the advent of copal, it may be have been suitably incorporated within that manner, also. If what I suspect occurred in that early time when painters formulated their own personal varnishes, a gelling varnish was indeed available to certain masters. As gelling varnishes, sandarac and copal have proven capable performers. Both jelly mediums offer nearly the same features-- though the copal is decidedly the faster dryer when sunlight is left from the equation; and the sandarac offers the higher gloss. Of course, the sandarac version would have predated the copal. [Question: why would these varnishes become lost to oil painters? Answer: again, by the 1700's, painters no longer made their own varnishes. Instead, they simply obtained varnishes from the colorshops; who simply obtained commonly-available wood or other coating varnishes to sell to their clients ...a practice that has continued down to our time. Yet, I reserve suspicion that some masters had an 'in' with some few varnish makers; knowing makers who crafted specific attributes into what I might easily term exotic mediums meant for that master painter.]
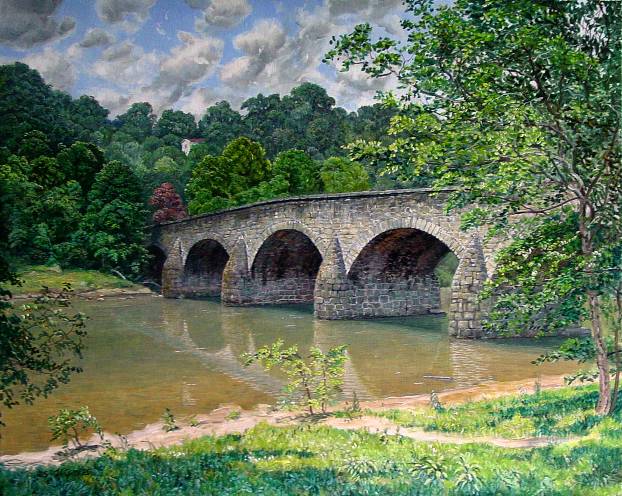
I recently painted the following 24x30 "Conococheague Bridge" using this sandarac painting jelly (1 part gel to 2 parts unrefined walnut oil). This work was performed upon a pure white sealed ground using my usual technique, which is, essentially, to glaze in the shadows first, then apply the highlights; followed by a final heightening, glazing and veiling. With this technique, the glazed-in shadows are usually administered upon a monochrome or rough drawing outline of the basic scene. What really helps the shadow-glazing step is the wizardry of a jelly medium, which records all the detail haphazard to the brush; and can be tooled to an ultra-effective level of modeled realism not available to a non-gel medium. Then, too, this glazing-in of the shadow tints upon a white ground provides, by happy accident, much of the incidental/reflective light (AKA 'ambient light') required when reproducing the effects of nature. Plus, the lengthier drying window of the sandarac jelly allowed me extra time to build in such detail.
With each layer of completion, a short sunbath effectively solidified the preceeding work, allowing the next superimpositions to be soon undertaken. The whole thing 'dried' to a wonderful glassy appearance.
While painting this work, know that I used a fair amount of my medium. I didn't over indulge; but I certainly did not starve anything. I simply used what was necessary, sometimes taking a bit of paint on my brush and going into my jelly before application. Some might feel squeamish reading this, as many of todays painters apply a thin coating of raw oil before beginning work, only to first wipe it down afterwards, leaving little upon the ground to aid in the practice. Further, their chosen paint is often that stuff straight-from-the-tube. Now THAT makes me squeamish! Why? I often utilize soft brushes in my finest work. With a proper medium, they do my bidding. I want especial facility with all paint-application. I am not timid with the landscape and I do not want my paint to fight my efforts. This glassy lubricity is the forte of oil painting! This forte allows manipulation and final results unavailable to any other means.
Perhaps you might doubt my words, thinking my work is doomed to darkness and wrinkling. I'm not worried. The great masters painted in a fluid oil manner. Look at Rubens. Or, go and seek out any landscape sketch by, say, Church, Kensett, or Gifford. Try as you might, you will not be able to copy their creations without plenty of medium added to your paint and ground. Doubtless, you will also find need of a jelly medium to really pull it off. Fact is, the olden painters' manner was essentially a nearly "water-color" approach, where the first-stage colorings are quite fluid and transparent ; though with thick blobby highlights applied in the final stage to indicate and supply solidity so necessary to great oil painting.
A wee bit more...
The following sequence shows the basic sketch/study technique of the HRS painter Frederick Church. I studied this painter and many others back in my youth. I believe his method offers much to the modern landscapist; certainly few painters of our time can match Church at his game. [BTW, you won't find this info and direction anywhere else today. I didn't get it from a book, either. One has to go to the source for things like this.]
Church pretty much painted everything up at once, rarely performing any sort of monochrome before coloration. I might say his method was of the most elementary, yet no one today can tell you what it is, or was. Above all, his method requires skill and a thorough understanding of the materials.
What you do is this: you look at any object, glean its general over-all coloration; mix up some paint to closely match this generality; then detail the mass of color using the shadow tint ; then, finally, highlight it all. After drying, if necessary or desired, further glazing, veiling, and heightening will carry it off to full wonderment.
As example, you see a haystack. You judge the overall mid-color and tone to be a yellowish-buff. On the fly, you dip your brush into yellow ochre, then go into some section of your white on the palette, combining the two. Then you grab a bit of brown and add in that too. Now you've got your 'local color' and you apply this tone thinly to your drawing. If you have the right medium and a proper brush, the actual stroking will allow the ground to show through and some apparent detail will become manifest. You can actually model the stack using this single buff color, alone. After this modeling, you judge your shadow tone to be a mix of pure brown and some ultramarine, and you brush that mix deftly into the appropriate shady side of the buff. This addition of shadow heightens the modeling. Finally, you mix some YO with white and touch that onto the lit side of the stack. You tool it all up well, maybe add or subtract, re-inforce using trial-and-error. That's pretty much it. Then you move on to the next object/section...say, the grass surrounding the stack. Mix a general midtone green and apply with hatching to the grassy area. Mix a shadow green or blue for that and insert correspondingly. Add some brighter yellows and greens for highlights. Then you move on....
Frankly, and again, this manner is simplicity through knowledge and experience.
How to begin? Church's translucent work, as seen today, clearly exhibits the penciling beneath the thinly-applied colors. Once drawn with the pencil, his medium and colors came into play and work went straight towards completion. I believe he used the same technique on most of his early larger works, though, for that instance and role, an overall outline drawing with actual thinned paint usually took the place of the pencil -- though graphite still came into play when a careful delineation was required. [C's later grand scenes seem to show some use of a practice I'll coin an "Optical Grisaille"; which seems to have played a major role in Thomas Moran's usual output.]
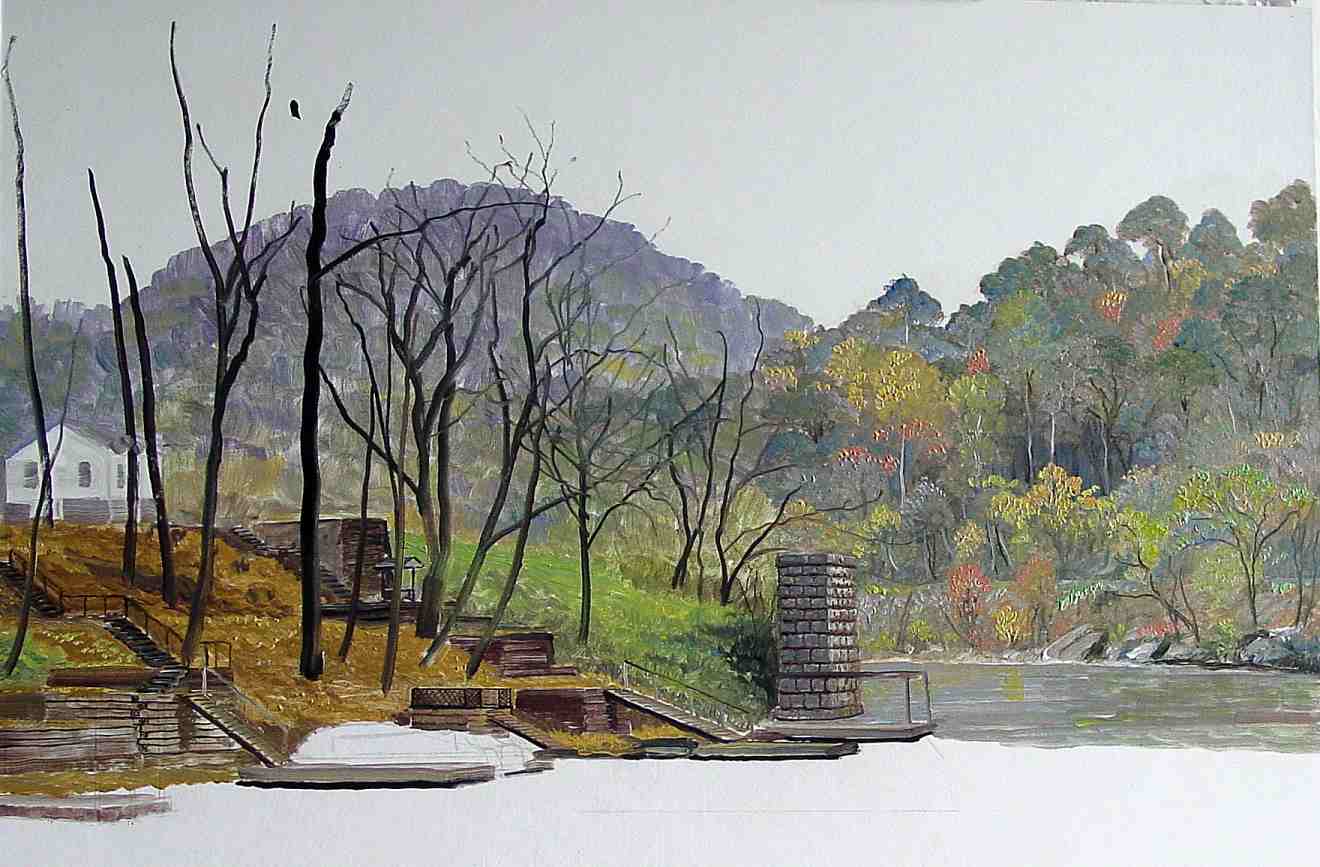
As illustration, I've applied this technique to a 15"x18" scene along the Little Tygart River, a lovely hilly area located just outside Fairmont, West Virginia. Proceeding with the manner of working, a heavy paper is primed beforehand with lead white (the old-style cheaply-available lead white house paint containing a bit of chalk works wonders for this priming; a slight tinting to some other color shade may be preferred by some). When this ground is decently dried, the scene is sketched in using a soft graphite pencil. Now, in my own example, I oil-out/lubricate the ground with the sandarac jelly in preparation to applying my colors. Church's work generally exhibits that look which comes from using plenty of medium with his colors, allowing them to be utilized with perfect fluency and without the step of oiling-out of his ground; still, there are some sketches which also show he sometimes resorted to applying an initial lubrication of his ground. What medium did C go with? Though mine eyes can easily discern his working manner, I am not privy to knowing what medium Church would have used ; though, and as is evidenced clearly by the fluidity of his colors, it was almost certainly a jelly type-- probably a copal jelly of some sorts. Adding some walnut oil to our Copal Gelling Varnish will easily match the effect; though, for my trial, I'm utilizing some sandarac jelly medium (1 part Sandarc Gel Varnish to 2 parts unrefined walnut oil).
Below: I am here applying a thin coating of the jelly as a lubricant to my white ground.
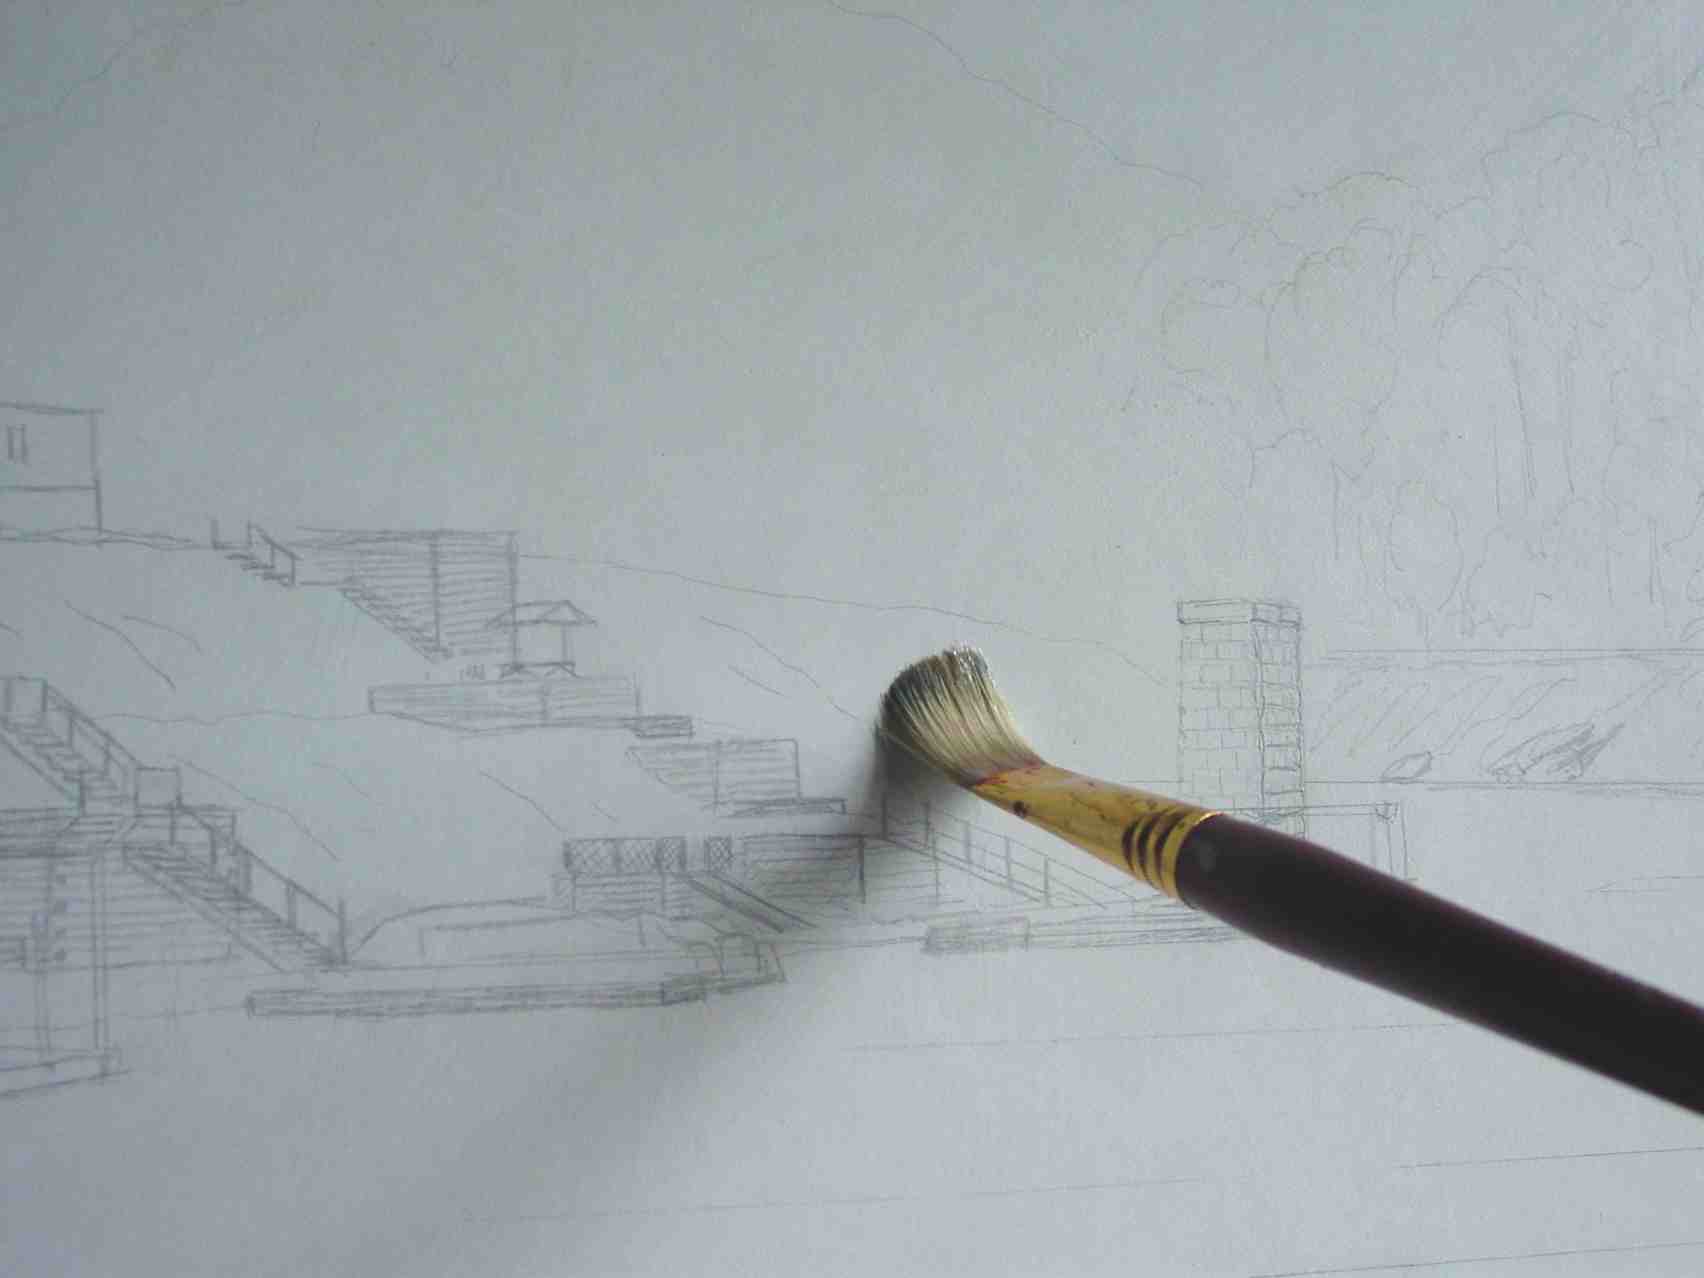
My few homemade colors are tempered on the palette with an ample dose of the same jelly. I want the paint to be easy to apply using my usual sable, soft bristle, or Taklon brushes. Important to this manner: the white ground must show vaguely through the applied thin paint. This helps achieve a sense of natural illumination, plus much in the way of incident or meant detail within the scene. Such illumination/detail is increased and helped along by pushing and pulling, jotting my brush into the gelled paint in a manner that imitates the complexity of nature. A jelly medium is a great expedient to this action. Everything is captured through hatching; though a soft brush can smooth away this stark-ness when desired. BTW, everything is kept vague at first, and nothing really stands out, so-to-speak. But then, upon this wet 'subtly-vigorous' imprimitur, the shade and the highlight detail is added with thicker juicy paint.
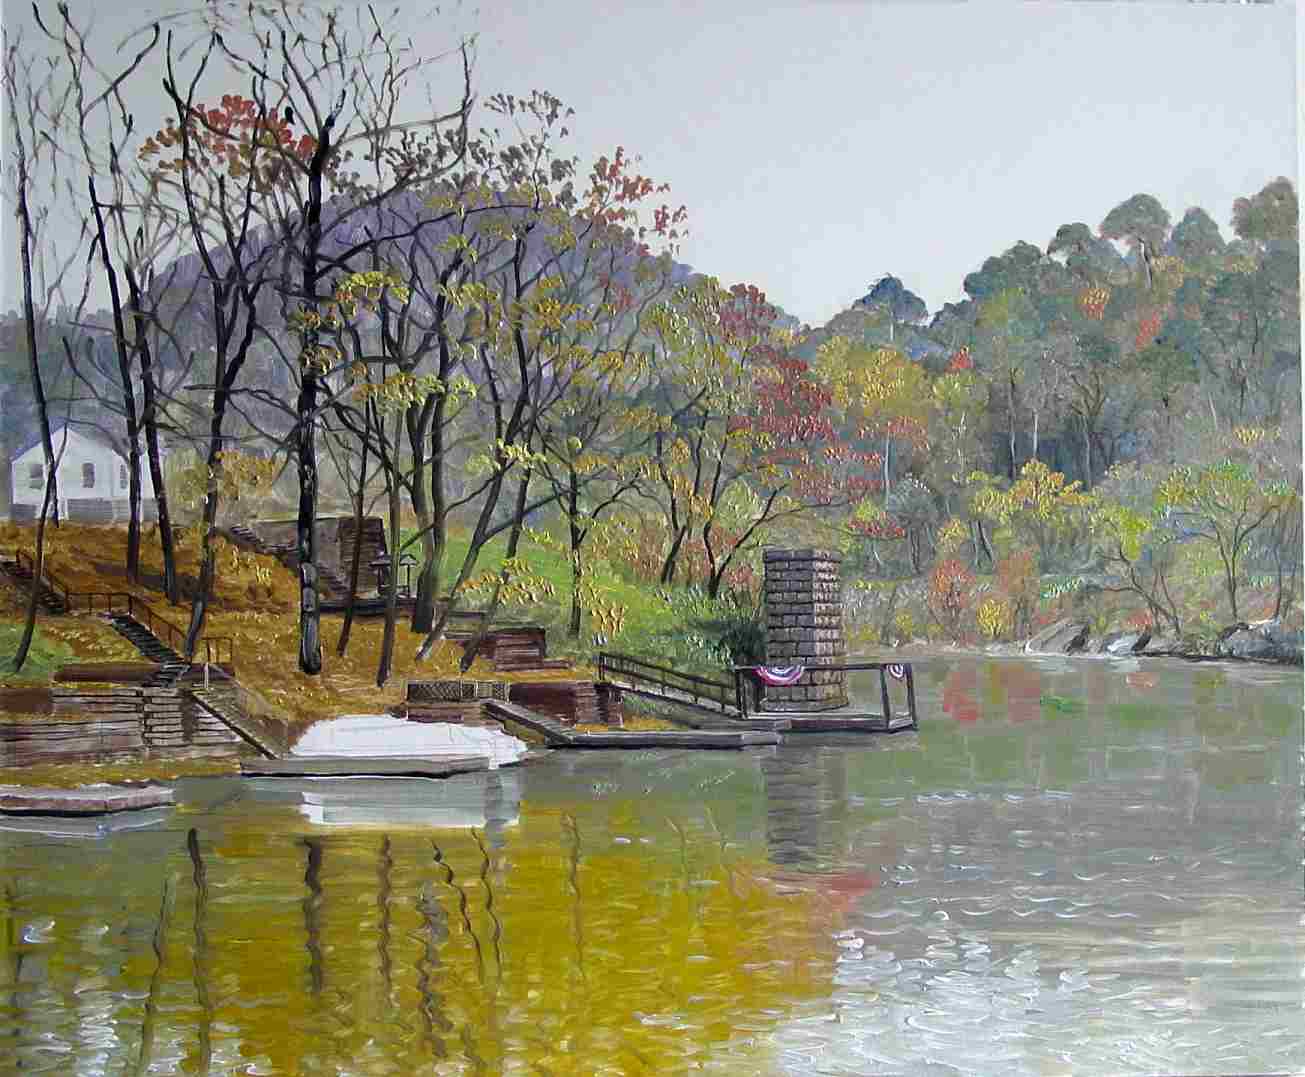
Below, beginning the coloring: Starting in the right distance, a touch of white is added to all my color-mixes, this to indicate the general tone and color enveloped by the intervening atmosphere. Stick with your usual colors; know them well, and the interpretation from what your good eyes see 'out there' will get you quickly within the ball park. If not, no matter, for trial and error will surely allow success. Do not be mixing up large amounts of colors and tones here. Just dip your brush into, say, Venetian red and black, or ultramarine, then into the white, gently entwine the mix and apply. Induce transparency and the color glows from within while also indicating much by way of detail.
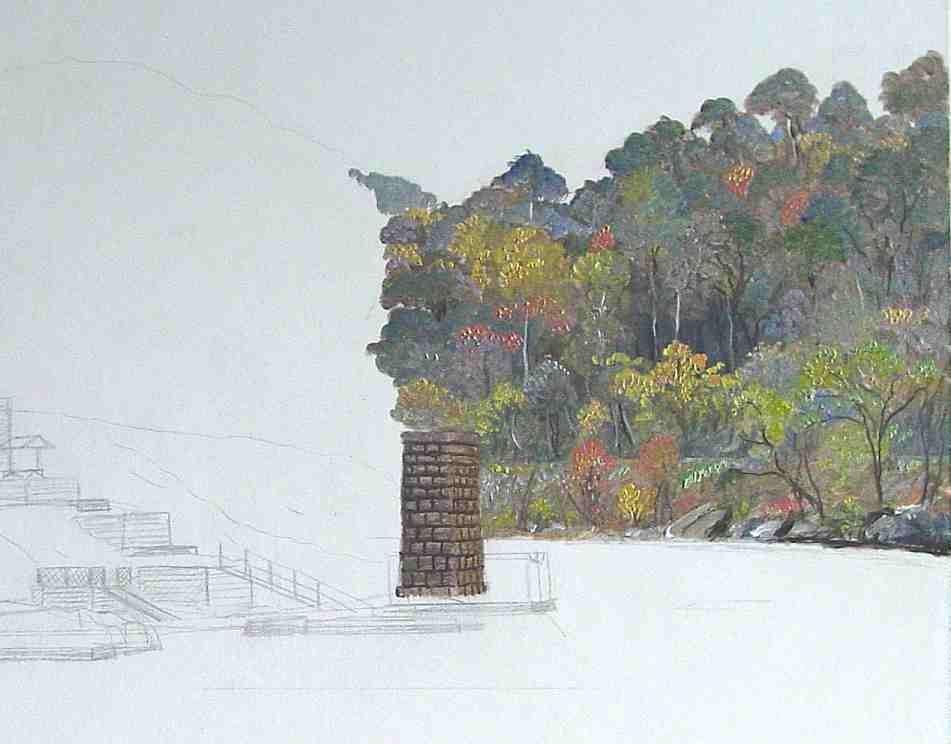
Notice above, how the old bridge pylon was painted by thinly brushing on the general brownish-buff color and tone of the stone; then the darker brown was used to detail in the stone-work. A sharp-edged brush was used to pull off some of the local buff to indicate the highlights on each stone. This simple practice is a hallmark of landscape painting in general (it can be effectively applied to figure and portraiture, as well). But, for greatest effect, the buff coloring must be, at least in some areas, translucent, allowing the underlying ground to help achieve the effect of nature's over-all illumination. Again, a jelly medium works wonders in this realm.
In the next image, you'll notice the pylon is finally given some blob-like touches of bluish-white to indicate its reflected cool highlights. Working with the closer ground, there will be less need of white in my shadow tints; often none at all.

Because the ground was oiled out with the jelly before commencing, tree trunks and lines, too, may be brushed on with exquisite fluidity and ease. BTW, it is important to get up and stretch every half hour, or so. The eyes need a rest, too. They become too enchanted with seeming progress. That's not good. The critical eye is the much better determinant of progress.
Finally, the whole is covered with color and in pretty much it's proper place. Time to quit for awhile. I get up, walk around, look at other things; then return with a fresh eye. Any glaring faults can be deftly corrected while wet; or later, after all is dry, you can glaze, veil, and further highlight (what T. Moran called "sweetening").
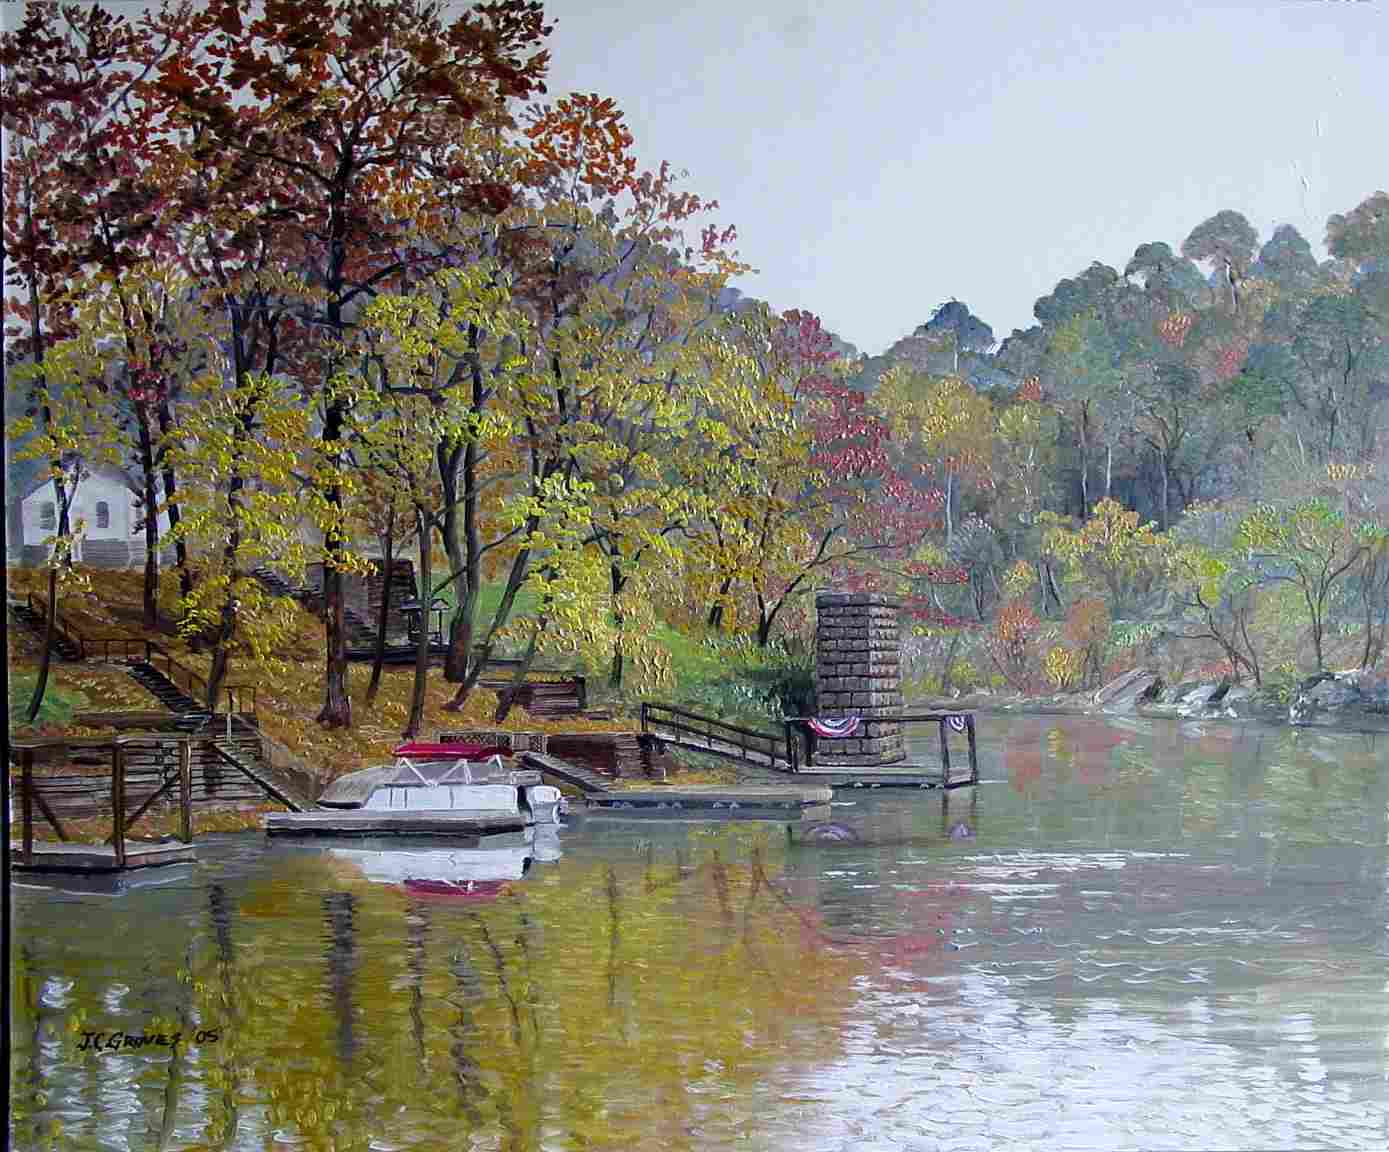
This will do; I shall call it "The 4th of July".
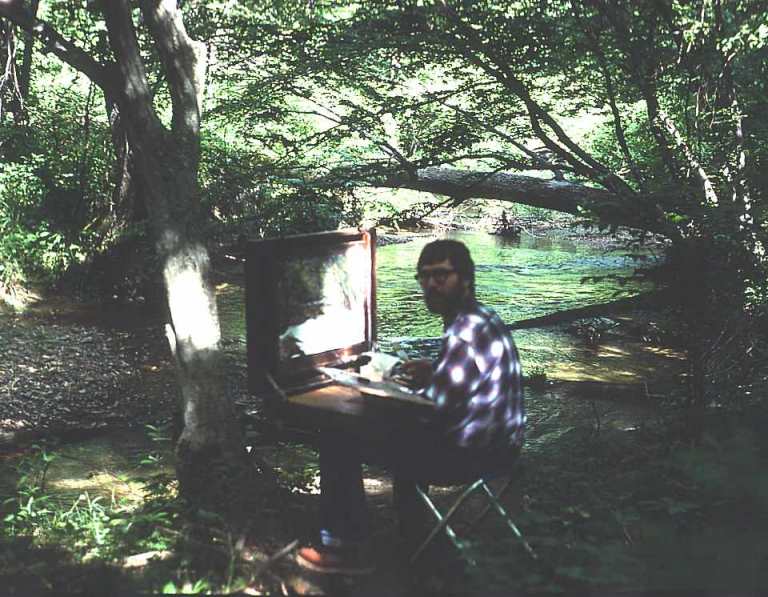
Above: Me, the young lad, a quarter-century ago. I'm putting in time doing the traditional Hudson River outdoor sketching thing, dressed in long sleeves against the flies and mosquitos. This shot is taken along the Little Patuxant River, a small often wooded-stream bordering Howard and Montgomery Counties in central Maryland. I'm set-up on the bank about three feet above the water. Painting 'en plein eire' was popularized by the French Barbizon painters; yet the American landscapists were out into it at least as early or earlier. Some would carry easels with them and set their work upon that. Me, I used a huge home-constructed sketch-box that sat upon my lap. Rather heavy; it carried everything imaginable and allowed me a large format. My colors were usually nothing more than store-bought tubed cad-red medium, cad-yellow med, and ultramarine blue; these mixed together to garner just about any color; and toning done with zinc white. My medium back then was 100% sunflower oil, often with a bit of beeswax melted into it. I'd use it to oil-out the drawing/white sealed ground before commencing color; also adding a good dose of it to my stiff tube paint.
Though difficult to see in this old shot, my method of attack was to use the pencil to quickly delineate the scene, oil out with my medium, then go in one section at a time, pretty much finishing up as I went along-- which is a method I still often use (see above). I think most painters today might opt instead for a broad general color lay-in at outset. Both ways can work fine, though; it's all trial-and-error, really.
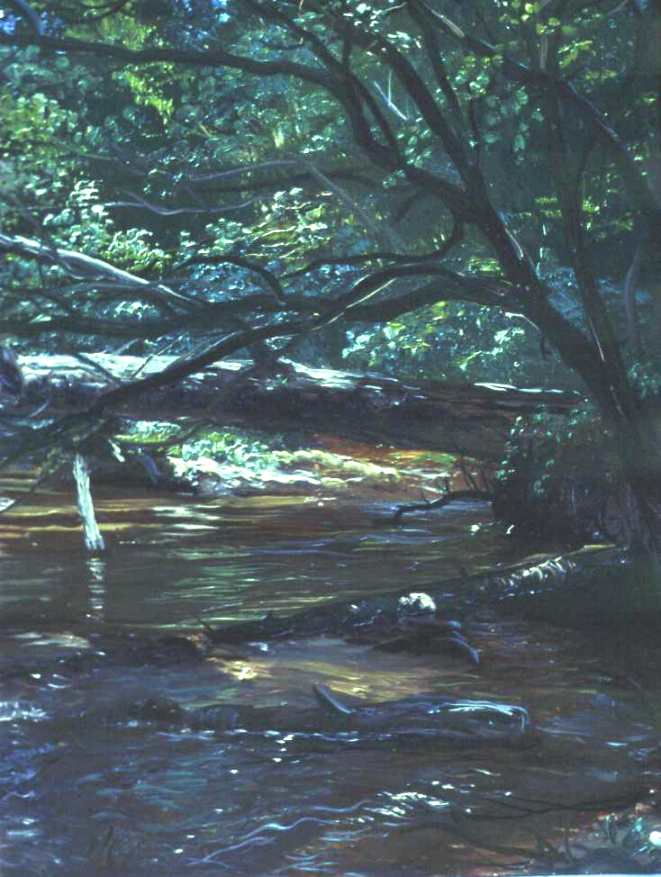
Below is the finished right-side detail of the sketch I was working on. That particular sketch went to a buyer long ago, though I retain these two shots. I dunno what happened to the slide showing the full scene. I'd often take slides of these little sketches, sending them out to magazines for shows, etc. Sad to relate, painting 'en plein eire' wasn't 'in' back then; nor was much of anything else done in the realism vein.
James C. Groves, September, 2005; updated with images February, 2006
For Ordering Online click here
Click here to visit our Gallery page.