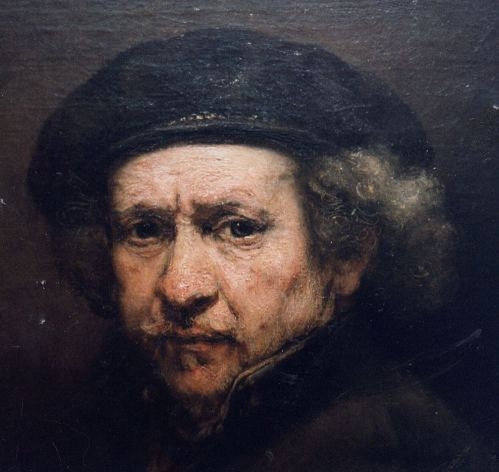
My Attempt at a Rembrandt self portrait Part 2


Here is a detail showing the paint topography of the mask before final glazing and finishing: The whole thing is 'dead' and rough when viewed in natural daylight. Prognosis? Glazing and some scumbling will both colorize and soften the harsh topography.


There are a certain few parts of the Rembrandt's "mask" showing over-painting with stringy, what seems to be a pure, untempered, white lead pink. What I mean is, such characteristics could not be easily made with shorter tempered paint, unless that was thinned more. Again, if R did use such simple paint� and I see no real reason to doubt it � odds are high he at least added a drying agent� such as the old Olio Cotto (lead paste).

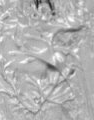
An example of such stringy (but drying!) paint is a clever and very informative jot at the bridge of the nose-- made best with the tip of a palette knife-- which left a long tail or peak as it was withdrawn. As the blurry image close-up below shows, as the knife withdrew, this peak folded over itself and collapsed with gravity. This jot is rather amazing to find as it is totally indicative of the very cavalier attitude on the part of the painter, who seemingly didn't care a whit for an overall smooth-approach to reproducing his own features; and, contrarily, desiring as much ruggedness within his creation as his tools and materials could muster. We can assume this rugged and outstanding jot was not alone as the highest elevation of R's portrait; indeed, there must have been other elevated areas to peaceably co-exist along with the jot. BTW, this particular knife-applied jot composed of a thinner paint ( could have been either tempered or un-tempered) was most likely made during the dead coloring stage. I now show these following knife-jotting images:

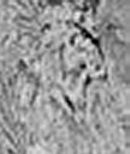
Here is a jot made by the knife leaving the paint surface. The paint is thick enough that the peak does not collapse. The peak forms as the gooey paint tries to keep hold of the knife:


Here is R's jot:


Here is a blurry full shot of the "jot" on R's upper nose-bridge (see above image) and likely made with the knife, its peak fallen downwards and forever pointing to the floor of R's studio (meaning, simply, he was painting this stage of the portrait while that was positioned vertical on the easel ):


Stage 4) Final Coloring. After skipping two more days to encourage at least surface-drying of the thickly applied paint (and making a few more additions), I mixed up some painting jelly and made very weak glazes and scumbles by touching into the jelly tiny speck-amounts of VR, YO, as well as shadow glazes made from these same colors plus Ultramarine blue. These shadows I carefully washed very faintly over the hair and hairline areas (as already noted above). Essentially, at this final stage, I was using the faintly tinted jelly to varnish my work. The shadows were brushed in first. A Venetian red glaze was given to the cheek; also the nose and the obvious highlight applied with a small thin brush loaded with white lead was placed at near center of R's bulbous sniffer. Some faint YO with VR oranges were washed in everywhere needed. I also used some vermillion red mixed with white to better colorize the mouth. Some soft white lead was made-up and a good many thin strokes of flesh-colored paint were applied using the liner. These occurred especially around the eyes, softening the harshness before seen. There is a bluish-green blood vein very subtley glazed into R's upper temple, this done using a thin sable. Not much painting was done this final day, really, for the work seemed mostly according to my remembrance. Few mixed tones were used during the construction of the mask. The use of handground paint negates a lot of the troubles found when attempting to blend modern tube colors together.

The final glazing/scumbling brought the various colors together and presented a pleasing and proper appearance. [The use of many initially-mixed tints is taught today for portrait painting. I will again say I believe this was un-necessary to the olden painters. Certainly, alla prima portraiture would require the mixing of more tints to begin with, but the clever painter using few mixes will apply some basic and purer tones quickly and surely; and then produce the differing requisite tones by brushing in slight amounts of the parent color as well as a titch of, say, white, black, blue, and red /yellow to get much the proper effect-- the mixing thus being done on the face, not the palette....a bit easier with the handmade stuff rubbed up fresh and tempered to suit.

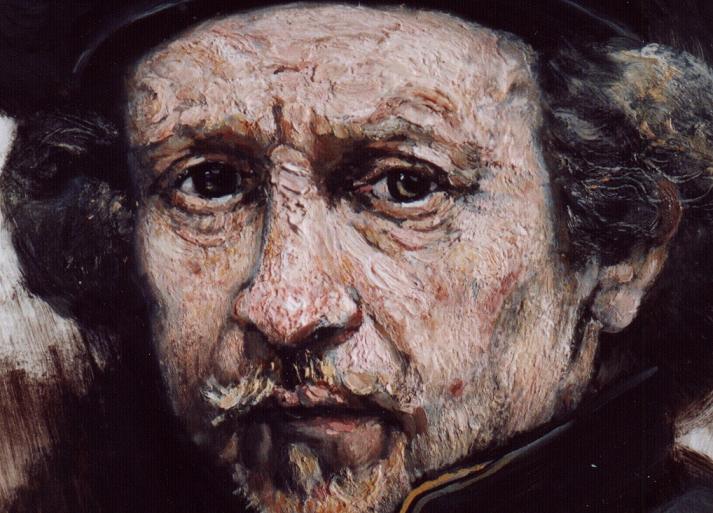
Below is the finished work photographed after all was dry. Due to the use of a rich glazing and scumbling medium, the work mostly dried with a pleasant gloss. A bit of sinking occured here and there where the glazing sank into the thick underpaint of the mask. This is a set-up for possible later fissuring. No problem, though; another scrub-on of the painting jelly in the sunken areas resulted in a perfect shine and lasting protection.


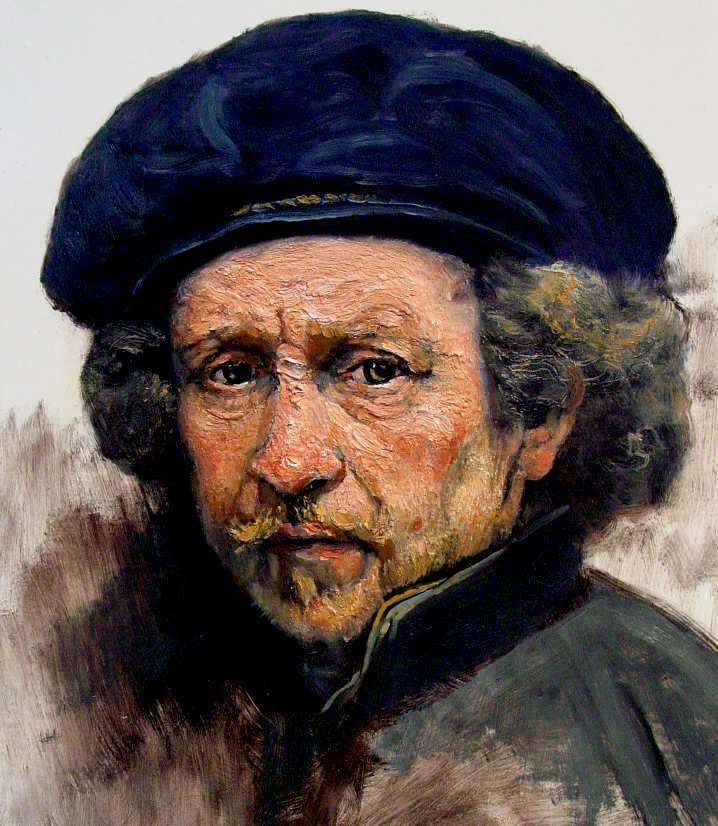
Rembrandt self portrait copy by James C. Groves

I realize this appears quite a bit more colorful than that darkly-recorded close-up of R's portrait posted at the beginning of this report; unfortunately, that dark image was the best close-up I had available. For those who might wish to see what this final colorful creation becomes when I use an image-editing program to darken the finished portrait and diminish the colors, click here.


Observations made while painting the "mask".

The pink colored "mask" was an attempt to build a clever and somewhat physical 3-D paint topography upon the canvas -- the theory being R did this to heighten the visual effect of the portrait to a level above the mere 2-D. Sounds simple enough, and with the properly thick paint consistency, a fair amount of "skin" effects can be tooled into the basic foundation of the portrait. Now that it is over and done, I think I would have been better off to have done my sculpting in the grisaille stage, using mostly the knife, and negating the pink mask stage entirely, and instead jumping to some thick dead coloring. Still, the method used did work out to my satisfaction. The ideal is to allow the grays of the grisaille to show themselves here and there throughout the work, especially in the shadows, and this through to the finality. I was able to do this.

I noticed a few peculiar characteristics while playing with the "mask". As mentioned above, while it was true I could accomplish some good and clever texture with a hog tool alone, my knife seemed to offer the surest route to certain aspects of the face. For instance, I found that applying the contours of the nose with the knife then waiting for that to stiffen overnight before stroking it with the brush produced the better means to more closely approximating some of R's own brushwork. For another instance, the dabbing jots with the tip of the loaded knife produced the aforementioned odd triangular blobs at the upper bridge of the nose and far better than a brush. [As stated earlier, this little detail could be easily accomplished using a thinner consistency pure white lead paint with no additions, though a bit of ollio cotto to speed drying was likely utilized. Why do I say this? Without something by way of a drier-addition, these little acts with regular pure oil-and-pigment paint will stay wet and unforgiving of overwork. I tried it...and it surely does get in the way of creativity]

Another thing. Throughout the painting, I never found instance needing the addition of turps-- nor do I see anything in R's work to suspect his use of such. I can see where certain points, like the highlight application to the nose bulb could benefit from a thinning of stiff paint with turps, but it could have been made without that artifice, too. Of course, the use of a proper stiff paint, combined with turps when thinning and ease in application is desired, will provide a paint that will fight against later and eventual slumping. [ Update, 2006. I now believe Rembrandt --as well as most Dutch masters of the period --did use turpentine spirit or other solvents on a regular basis and within their actual painting; though such addition was likely accompanied by some type of resin varnish. A strong resin varnish addition increases the binding power of simple oil paint and can allow much dilution with solvents, say, to perform thin applications of that paint. As for creating impasto, a fresh thickly rubbed-up oil paint will congeal to a firm state when given a dose of strong resin varnish. The subsequent thinning of such firm paint will immitate the characteristic texture seen in R's work; such paint should bear the test of time nicely. Of course, the use of solvents with oil painting allows 'set', meaning the paint stiffens with solvent-flash, allowing fresh paint to be applied or 'built' upon the firmed underpaint. Such paint-build means several layers of thin or thick paint might be applied in one session, or before the whole paint strata dries. ]

While copying R's portrait, a constant thought wrestled with my desire to reproduce the facial texture seen in the photographs of R's portrait being scrutinized. This was the effects of Father Time thing. I asked myself, again and again, " Do I leave the thick paint at rich and rugged attention, as it appears to be coming directly from my knife-use and slight, subtle brush-tooling ....or do I stroke it all down to a smoother condition -- more like that which seems apparent today?" I didn't have the original portrait before me and sometimes things do not appear so well in the photographs. But, thanks to things like the revealing knife-jot at the nose bridge, I was confident I was close to achieving my intended purpose. As such, I chose a middle road and retained a general bolder relief. I presume my paint will ultimately levelize to some extent, though the original stiff condition should allow plenty of "back bone" to be available by the amounts of actual pigment in my textured mask. The best consistency, again, was gotten by making up some rich but thick paint then adding a stiffener to make it firmer and shorter. I do not suspect such thickly-produced tempered paint to be under-bound and subject to cracking. This is something I might incur were I to use thick under-bound, and untempered paint.

Something else I saw. A careful attempt at recreating R's brushwork will eventually show two opposed personalities. Indeed, paint can show insight to a personality. In R's case, most of his brushwork shows a fast, sure, even carefree methodology in application. But then, so contrastingly, there are several places showing great temerity. Scrutinizing the photos I took in '94-- photos that catch reflected light from the central skylight of the room-- I note there are clues that seem to show R doing a lot of fussing with this portrait. For instance, the thickly applied darks and shadows around the eyes and mouth cry out a trial-and-error searching for just the right expression. Premier coup is not evident here. The thought crosses my mind that these timid areas might have been applied through several attempts at restoration by hesitant, exceeding careful conservators attempting to correct the typical haze resulting from varnish-removal and paint repair. Black would have been added here and there where the spent varnish haze lightened the darks. I believe such hesitant indications of a fussy jotting-application could certainly have come about in later times. But maybe not....maybe R himself made the corrections over a period of years (the build-up seems quite heavy). I presume he was in possession of the work for most of his later existence; so who can say? Here is an image showing the faint but still evident light reflecting off the heavily-applied build-up of the darks bordering above the eyes in the National Gallery's portrait. It's not too easy to see these areas but one application stands out especially atop R's right eye (just below the brow line). Note the slight reflected light showing the dark areas are indeed built-up:


In winning struggle against the mentioned timidity is the bold knife-work which does seem to be beneath the surface of R's portrait. I might presume this knife would be the one used to rub up R's paint just before commencing his daily routine. That is, it would be a long thin and slightly tapering blade with great flexibility. I know it had a rounded tip. This is the more-common type found today. Though we generally associate use of this tool with blobby and callous work, such a tool is perfectly suited to allowing what can be termed fine work with oil paint.

BTW, the modeling of facial features using some crisp short paint with the knife alone can be found in another painting. This is The National Gallery of Art's "Portrait of an old woman". I post the image here (but cannot find my source of attribution for it. I will remove it if the NGA wishes).


I invite all curious viewers to take a good look at this image and note the use of the knife in applying the variously-colored swaths of heavy, non-stringy, and somewhat short paint in the elder's face. These applications with the knife establish the various elevated planes/contours of facial topographical relief-- what I've been terming a mask. I strongly suspect this particular odd use of the knife to be unique to the historical realm, appearing in no other artist's paintings I am aware of (though perhaps R's students may have picked it up). For a better more realistic finish, the next step would be to assimilate all these differing planes together by additional brushwork. Yet, in this case, they are left alone and NOT further re-worked, or overpainted after drying, with the brush-- though they ARE glazed and scumbled after initial solid drying.

This "Old Woman" is indeed a curious portrait, resembling the same technique exhibited in the currently recognized-as-a-probable-non-Rembrandt work titled "A man laughing", and seen here:


There is no doubt in my own mind these two small paintings (measuring about 5" x 6" ) were done by the same hand. The supposed non-Rembrandt is on copper, but, though it is rare, I have seen four other small attributed-to-Rembrandt works also done on copper. One of these is "Rembrandt's Mother", also small. Of course, there is a full-sized counterpart of "R's Mother" based upon this small study.

The question arises concerning these two works seemingly done by the same hand (Yes, I think it was Rembrandt's ) and utilizing the knife so vigorously while creating what I call the "mask"relief. This knife-work could also have been preliminarily introduced at/during the grisaille stage of the portrait I attempted to copy. However, these two small works do not appear to have a grisaille; just the typical brownish monochrome and then the much-knifed-in mask done with color; and that was then allowed to dry, then final glazing and scumbling. Might these have been simple attempts preliminary to production of a large version, like the one of R's mother? Yes, I think so.

Very important: I do believe this applied planier or contouring knife-work "mask"was actually a methodology utilized by R as a step in his progress; and that it was commonly used only as a brusque intermediate stage by him, i.e., something to apply additional and impasto-ish over-paint upon (or also immediately into, as I chose to attempt, and with decidedly fair success). I mean, as it occurred to me as I was attempting my initial 3-D build-up of the relief mask, what better and simpler method to apply this paint thickly and readily available for subsequent modeling / tooling with the brush? I can only regard it as a valuable methodology to develop elevated planes of skin or facial-relief. And so I put down my brush, grabbed the knife, and was working away with it when it hit me like the proverbial ton. Something I was doing looked familiar. Setting my knife aside, I went to my little library to pore over some book reproductions. I flipped to the photo of "A man laughing". Curious! I also pulled up a couple of images on my computer; one being Rembrandt's "An old woman".

I show details of the two below. Note the use of the knife at the bridge and tip of each's nose. These show the very same hand was responsible. You can also get a good indication of what the knife looked like (BTW, the paint appears to be that typically "short" stuff gotten by adding some drying -- i.e., cooked with drying oil, or litharge -- resin-in-oil varnish to the paint).


The similarity is just too good. Look at both nose tips/bulbs where they cross into shadow. Note how each roundly-ridged knife-stroke is done. In each case, two knife-strokes make up the bulb of the nose and the down-curve towards the nostrils; while a third and nearly horizontal stroke completes the bottom curve and finishes the wrap-around (don't let the shading applied during the final glazing stage keep you from detecting the perimeter of the knife-stroke-- it is visible). There are other similarities, too.

Bingo. In one quick instant, I could easily pair the "Man Laughing" with the "Old Woman" in what was in my mind a perfect marriage that will not be broken. Thus, if the NGA says the old gal is for real, than I'll take the happy fellow along with her and ascribe both to the minister who joined them. Indeed I do think this was R's handiwork --and his own odd technique. The thick knife-paint applications allowed an expedient and effective 3-D relief above the canvas, helping the illusion of reality by the addition of a third dimension. Except in small studies, it appears these planier and further-un-tooled knife-strokes were never left available to the final glazing and scumbling/ details stage-- except as incidental oddities faintly showing here and there beneath the final toppings of additional thick paint. Further tooling with brushes was the norm. But in these two small studies (and others), the knife-strokes are left alone, perhaps as a reminder on how to initially proceed on a larger verion....?

Has anyone ever noticed this odd use of the knife?

After completing my own mask stage, I came to realize something else. This odd planier /contouring knife-application was truly --albeit barely -- still visible beneath the surface, here and there, of my own copy. The effect is slight but sort of gives an impression of skull beneath skin. And, BTW, it is also seemingly discernable in the images of the NGA Rembrandt self portrait. Check out the nose bridge, its sides, and also beneath the nose above the right lip (see the detail at the beginning of this report, above). Yes, the knife contour-work seems to be there within the portrait, lurking quietly just beneath the outer paint....and it does add something to the visual recipe.

I only wish I could have made a quick journey to DC to see it in the "flesh". I have no real doubts but that the knife-applied contour strokes are probably and subtly everywhere about the original. BTW, I have now also detected this underlying contouring knife-work in many and various other detailed images of works known to be Rembrandt attributions. For one instance, "The Disgrace of Aman", 1665, at the Hermitage Museum in Leningrad, plainly shows the contours applied with the knife still resting comfortably here and there beneath the final paint.


So, what Medium did R use??

In R's technique, the medium seems rather secondary to the overriding physicality and charm of his technique, though, do realize a proper medium can allow finesse and longevity, no matter the technique. R's paint, especially his built-up impasto, is thick; and I see few instances of it otherwise. It looks in all ways to be made of walnut oil as opposed to linseed oil. Paint made with linseed oil and applied thickly has the tendency to wrinkle, due to rapid surface drying. In some cases--such as the afore-mentioned Albert P. Ryder's works, it is said to be still soft beneath the wrinkled modern pellicule. I can detect no such wrinkling in R's heavy paint. This heavy condition is very important to attempting any reproduction of his work and method. The paint must be thick! Further, I think it should be crisp during manipulation. Of course, if ground too thickly, simple lead white paint (oil and pigment alone) is sluggish, gooey, stringy, and, importantly, prone to cracking due to being possibly underbound (especially when it's further thinned by a solvent). Drying time is also a consideration with thick paint. I presume R used something to speed the drying effect. In its favor, pure pigment-and-oil paint, if thick, may stand well over time and not slump much, as is common to basic creamier-ground paint.

As to other considerations, there is a general thinking going around today that an addition of chalk might allow the "pure" lead carbonate-and-raw-oil white paint to exhibit less stringiness. I have never tried bulking my lead white, so I'll leave that to another (update, June, 2002: I have tried adding various amounts of chalk to my lead carbonate while making paint. The slight addition of chalk-- about 25%-- did not allay stringiness but rather increased the trait instead) . Also, there are thoughts the old stack method of making lead carbonate might allow the crisper paint condition. I used to make my own lead white in that manner. I found the paint at least equally stringy to what I obtain today from the modern process.

Myself, I would prefer a basic good and heavy creamy-bound simple walnut oil white lead paint with some sort of stiffener, such as a fast drying resin-in-oil varnish, or something akin to my own oddly stiffening and quickly drying walnut HB Oil.

If an additive was in R's paint, what might it be? Modern Science has found only simple paint with possible and slight additions of a heat bodied oil. I certainly can side with that, though my suspicions are the slight additions of a "heat bodied oil " was likely a high temperature resin-in-oil varnish-- pine, copal, or amber.

I feel comfortable my own use of the drying walnut version of my odd HB Oil produced excellent results. Then again, I know a similar effect can also be had by the slight use of a high temperature resin oil varnish, like a copal or amber varnish-- especially those cooked with lead as a drying agent. These types of varnishes were available at the colorshops to painters of R's time and much earlier as well. Curiously, as is now revealed by some current testing, such a resin-in-oil-varnish seems only to give findings of a heat bodied oil, as the resin's markers are destroyed during the great heating required to combine it with the oil.

Regarding lead paste, or "olio cotto", it would have been well known in R's time and might also have been the means to his brushwork. A drop or two of that will also shorten the consistency of white lead and make it better drying and nicely crisp; that is, if the lead paste is fairly fresh and not too aged. With age, the lead in the paste causes polymerization to come on, resulting in a strong heavy oil goop that in no way provides crisp brushwork. [ Lead paste is a thick black substance, involving the cooking of about 25% LC with 75% oil to about 450 degrees F. It is not available in shops today. Making it can be very dangerous. Its dark appearance would deter some from using it with whites, but, my notes from years past remind me that the dinginess bleaches out on drying and exposure. If stored in a tube, it seems to last for years and even lightens to the color of caramel. If not kept airtight, it polymerizes.] Like resin-use additions, lead paste may also keep the paint strokes sharply delineated down through the years. I would easily consider it a strong contender as a means to R's paint condition.

I do not suspect any major spirit varnish-use in Rembrandt's operation, as that type varnish, though it could lead to R's obviously lasting and standing quality, should be, nevertheless, easily detectable by modern paint analysis. Right? Another thing: though spirit varnishes shorten oil paint admirably, they do not actually accelerate the drying. There is one exception I have found to this general rule, and that is a spirit varnish made by cooking a certain type of resin with litharge; this coupled with a solvent would create a spirit resinate varnish, which would promote faster drying like the oil ("linoleate") versions.

Curiously, there are rampant findings of "pine resin" in many paintings done by the masters of the 1600's and earlier. This finding may be due to numerous causal situations. Might the old masters have simply stored their paints in bladders using a bit of pine spirit to keep it short? Or perhaps the increasing use of turpentine left tell-tale terpene markers leading modern chemical or flame analysis techniques to show very slight use of pine. Of course, down through the ages of oil painting, various coniferous spirit varnishes were also used as a final varnish on new and old works. Oil paint, especially very fresh as well as very old oil paint, will imbibe a little of such spirit varnishes during application. Again the result would or should be misleading to exact analysis. [ I am surprised no pine resin has been found in R's paint-chip examinations thus far.... ]

Some other thoughts: Perusing the various close-up photographs made of R's portrait, I find no sure evidence showing use of sun-thickened or typical "heat bodied" semi-polymerized (boiled ), nor even slightly heated oils made over several hours. Please realize, use of such aged or artificially aged oils as grinding agents or additives create long paint that even resin varnish additions will not bring back to cripness. If your handmade paint is not crisping with a resin-varnish, suspect your grinding oil is past its prime. Get some fresher stuff. Further, when used as additives, even small amounts of the aforementioned regular semi-poly-agents ( like standoil, sun-thickened, aged) will melt the simple handground paint, as well as increase gooeyness, stringiness. [Yet, I WILL say, use of these "long" agents can often-- in very spare amounts-- help the copyist using modern-day tubed colors to come close to R's comparatively "longer" manner. These semi-poly agents are quite helpful in overcoming the drastically short (too crisp) nature typical to paints made with aluminum stearate as the stabilizer.]

And so, to my own eyes, R's paint does not appear to possess anything unusual to the old-time realm of hand-made paint and oil painting. I have little doubt his paint was at least 95% pigment and oil. Was it straight 100% walnut oil-and-pigment paint. I really doubt that. To my eyes, it was tempered with something extra. Perhaps a touch of olio cotto or resin oil varnish? Could be. The inherent gooey, stringy nature of lead white handground has a certain look. And not finding much of such has caused artists down through the ages to suspect R using a touch of resin varnish here and there in his work. But, who can say for all situations? Just maybe the resin isn't necessary. Dare I repeat, the gooey character of my own simple white lead will be offset by the slight use of some fresh olio cotto as the drying agent. The knife may supply something also. But, I do wonder, will it stand or level with time without benefit of a hardening resin? Resins do give such resistence. Oil alone is known to level eventually. Questions, questions. And to throw something else into the matter, I have found an old recipe similar to the odd HB Oil I make within a 1687 book by John Smith titled "The Art of Painting in Oyl".

Final.

This exercise was my own attempt to emulate someone considered as great a portrait painter as any who ever painted ....ever. I confess, I have painted few portraits in my own life as an artist; and I feel more inclined to the landscape. The technique as supplied and utilizing the four stages is my own guess for arriving with a similar production to Rembrandt's self portrait, which is but one of about a hundred self portraits done throughout his life. Doubtless, there are things I cannot know concerning just how this painter worked his clever use of paint. And, who can fathom the ultimate effect of time and restoration attempts on the condition of the work as we see it today. Certainly, it has flattened somewhat from it's original relief. But, anyway, I do feel the technique I show herein did produce some fair degree of similarity to the 350 year-old-painting. I also feel comfortable I have achieved some basic familiarity with R's methodology. Of course, as I cannot be certain what technique the old master chose, I make no claims my own methodology is or was his methodology. Rather, I feel it comfortably better to simply pronounce it my own...and nothing more.

For those taskmasters (like myself) who think I have failed to show a perfect likeness: you are certainly correct. Yes, I did try. But of course, it was through the use of photographs. Perhaps it should have been done right there on situ at the NGA? Maybe not, though. Sometimes complicated things are better thought out/worked out at fair leisure and surrounded by familiar space. Besides, to a personality like my own, leisure and familiarity are not what I equate with a lengthy spell in DC or setting up my easel as entertainment to visitors at the NGA. At times, the careful painter might better drop the brush and run for his samples and other notes/ images in his/her library. Then too, any one attempting to copy a work obviously done through a layering technique involving lengthy periods of waiting-for-it-to-dry-before-over-painting spells should never try to accomplish his repro alla prima-- even a slow-drying alla prima.

And so I will remain at my studio for now. My very next trip to the NGA will tell me all I need to know as regards my own performance at copying Rembrandt. [This is not to mean that I bow prostrate before my elder. No. Behind the legend he was just another practicing oil painter. Many others produced glowing representations of the humanity of his time. To my eyes, his better work stands out due to its odd heavy painterly texture. I'm pretty sure he didn't totally invent the technique and that it was probably gleaned by thought, insight, much paint-pushing experience as well as from bits and pieces of other's work he was influenced by. Fact is, his smooth works do not capture my attention to the degree of his more painterly creations. Further, I have a preference for a good many 19th century (+) portrait painter's work. Of course, if R were to talk with me about portrait-painting, I should better listen intently. Then again, were I to talk of landscape painting, he should best listen to me. Oh well, that won't happen in this life and I should only say I am now somewhat more familiar with this long dead soul and nothing more.]

My attempt to copy Rembrandt was valuable as a learning experience. I'm sure a little of what I gathered during my exercise will extend into my very next original. At my age, acquired know-how, and experience level, I can produce just about anything with paint. Show me the oddity and I'll see a way to produce the same effect. But of course, one thing I always keep in mind is: 'there are many ways to skin a cat.' My conjured methodology may not be identical with the source.

I would always promote the copying of admired works to gain possible insight and skills. I see no harm in it. However, if you attempt copy of an old master work, aim straight; but understand a close miss is about as valuable as a direct hit. Chin up! Realize, no painter, not you, not me, and not Mr. Rembrandt, can reproduce even our own previous work to exactly the same degree. This degree of imitation decreases as the complexity of the work increases -- as in this case wherein the work is very old, was done with probable bold relief, and where the work finally arrived through a fair amount of struggle and trial-and-error correction proceeding over dried under-layers from previous underpainting. In such instances, the best attempt at emulation must always fall a bit short. Brush strokes are like snowflakes in that no two brushes, especially used brushes, exactly match another. Angle of application and loading are imprecise and delivered mostly through unconscious habituary. The relative consistency of the paint itself can offer great variance. Palette knife work produces topography that varies amazingly with the angle of attack, even according to the degree of air bubbles trapped as the knife hits and sweeps the paint -- thus producing elongated oval cavities. Any knife work is further compounded by re-working with the brush and that's type and condition. And, all this does not take into account the confounding complexity arising by the intermingling of various colors.

With all respect due Mr. Rembrandt... and those having endured my writing.

James C. Groves, March, 2002

Update, 2006. Latest findings brought out by a study of Pre-Raphaelite paintings at the Tate Gallery show resin-oil varnishes, when added to oil paint, are still proving undetectable by modern-day analysis. Instad of resin-markers, the findings from tests performed on suspected paint-chips merely show traces of heat-bodied oil. With these most-recent findings in mind, I still believe it most likely painters in Rembrandt's time were fond of adding strong resin varnishes to their paint. Additionally, I have since come to suspect the preferred use of solvents along with such resin-fortified paints. The probable resin-contenders for such varnish-types would be: amber, copal, sandarac, pine.[ Though pine is the weakest in the list, I have only the greatest faith in it's durability when cooked into oils.]

Click here to visit our Gallery page.

Click here to visit our Mediums page.

Click here to see some J.C.Groves originals.