The Stereo
Below are the existing right and left side details of the LOC-owned stereo taken of the dead sharpshooter lying in his "Home".
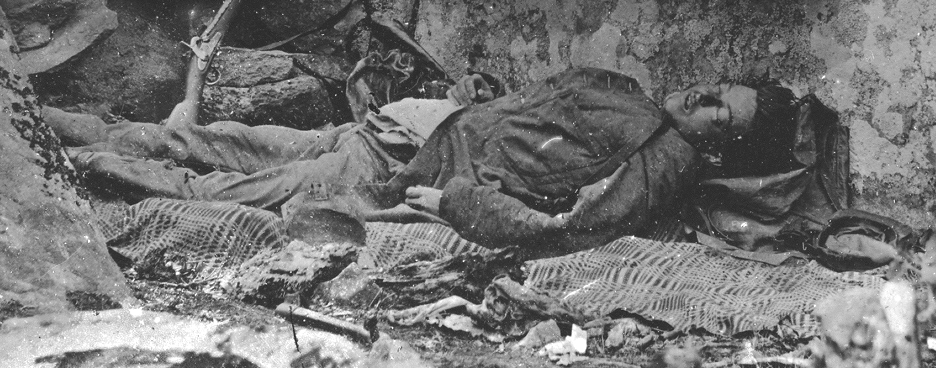
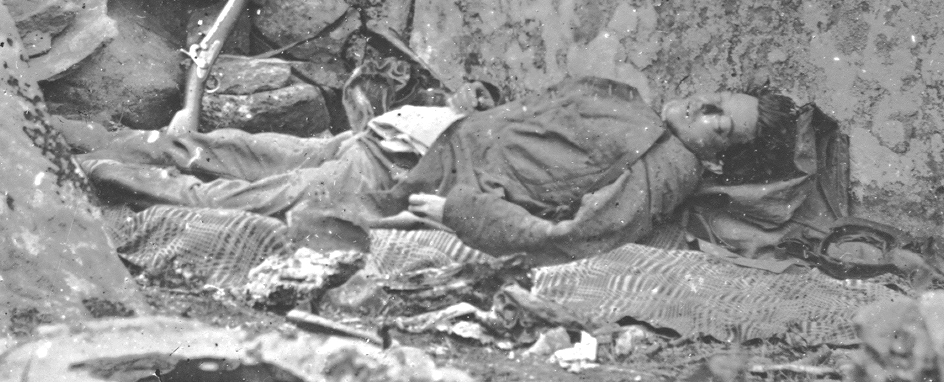
Stereo left side
|
||||
Position yourself: sit back about 30 inches from your screen.
Put your mouse curser on the dark top margin of the 'stereo's right side'. Click and drag the image further right to a point where you can see the full rock in the left side. Now, concentrate, without blinking, at the junction of the two images. Let your focus lazily drift a little byond, as if you are looking into your monitor. An optical mirage third window will seem to appear between the two images. As you do this, slowly ease the right image over a bit to the right. If all works, the large sharp-edged rock on the left will suddenly 'pop' forward, and the legs beyond will noticeably recede into the background.
Keep trying. You should be able to obtain a 3-D effect with a bit of practice.
Then, by slowly dragging the right side stereo image over, more and more, it is posssible to view the entire leg area of the dead sharpshooter in stereo. You may have to lean further back away from the screen. But don't blink or you'll lose it. It takes a little practice, but, hopefully, you will be able to attain the proper 3-D effect.
The above details were taken directly from the "Home" stereo image.Thanks to the online Library of Congress website, the full stereo image is now available free to everyone in a high resolution scan. I recommend all to go there, do a search, find it, and download it (I would post the address but the LOC site changes page-addresses on a regular basis).
The Library has also posted a hi-resolution scan of image 4, which is the stereo image made downhill showing the flattened and twisted right leg. This image represents the best view of the crater-like rock-impression. I have cut and inserted both left and right details of that image so that a 3-D comparison can be seen.
Click here to see these downhill details of the body
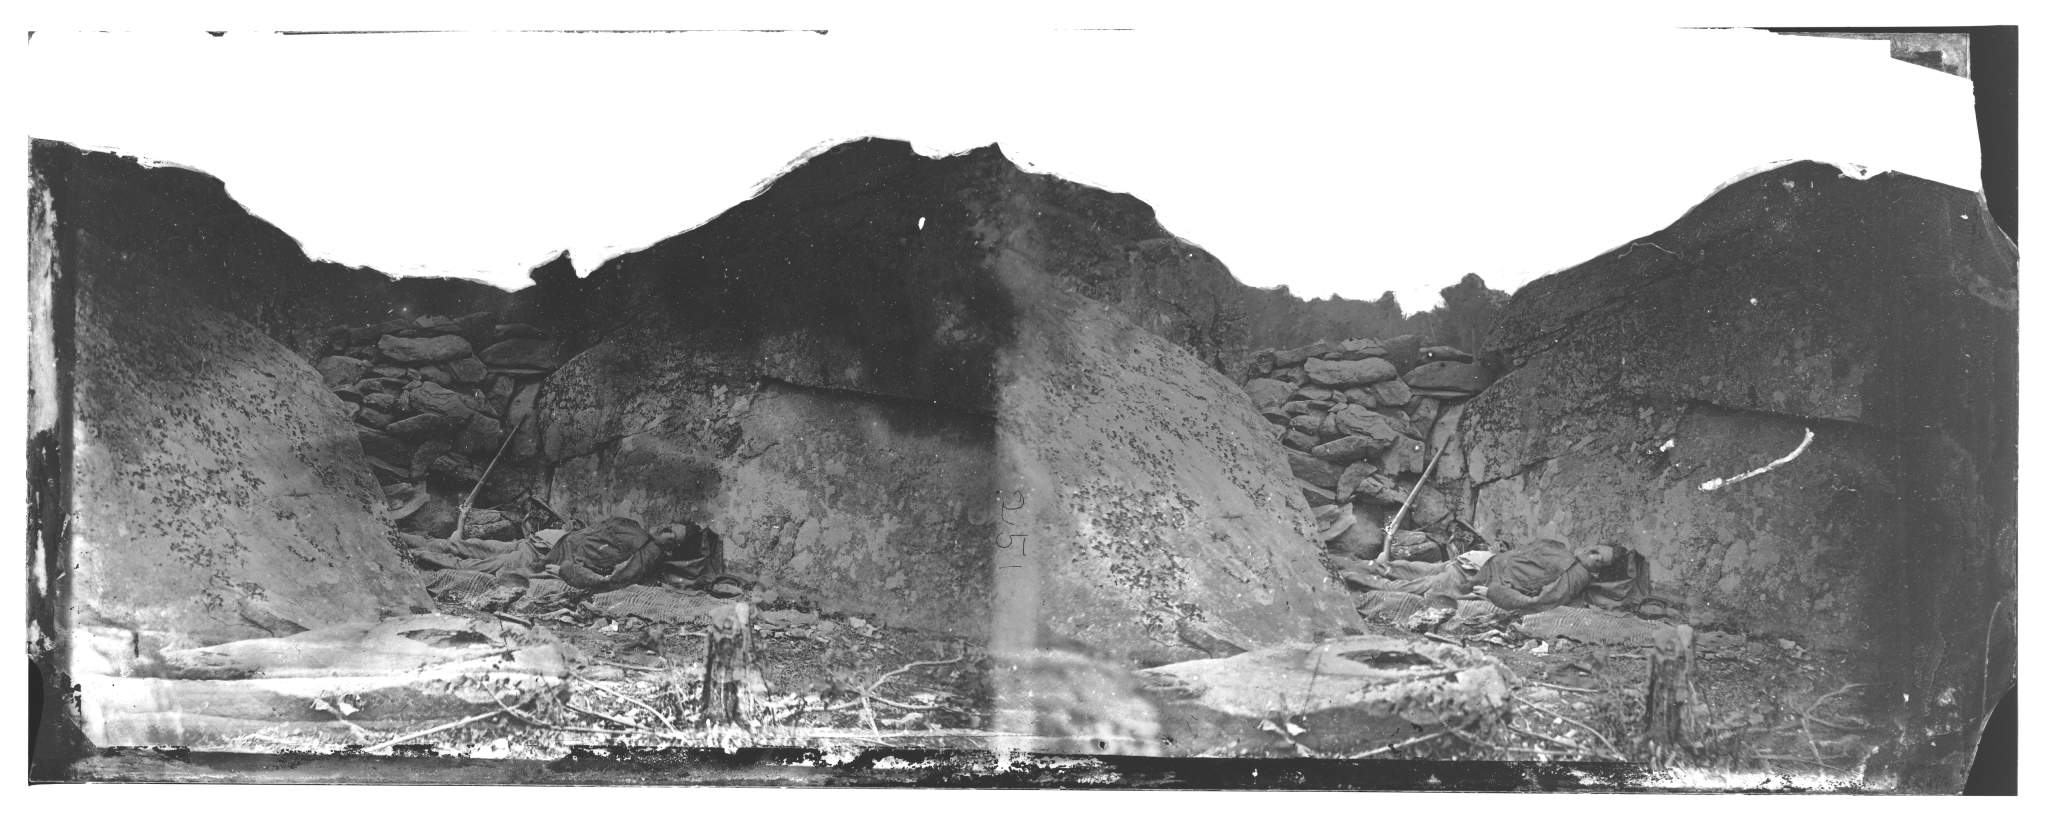
Examination of the full Home stereo
This is a compressed view of the large resolution TIFF file scan at the LOC website. The LOC scan is 20 megabytes; my version is only 250 k's. My server cannot handle such large scans; so you should visit the LOC, find their image and download that if you wish to print out a full stereo for use with a viewer. This act will provide you with some challenging fun.
If and when you download Gardner's "Home" stereo, print it out using a good photo printer and with the finest resolution. Or you can put it on a CD and take it to Walmart, then use their printers to make one up. You should size your image to about three inches high or less. That will provide you with something a normal-sized stereo viewer can handle. You'll find the LOC image to be rather dark and low-contrast. No problem, for you can simply lighten the scan using whatever image browser your computer has available; or, leave it be if you desire purity.
BUT...no matter how well you've made your stereo print...it won't work. It will refuse to pop into 3-D.
My first stereo "Home" experience
I obtained my first stereo image of the "Home" in late 1997. It finally arrived in the mail and I eagerly set it out on the table. Unfolding my cartograher's stero viewer and positioning it centered over the image, I tried for at least 5 minutes and got nowhere. It refused to 'pop' into 3-D.
My frustrated mind told me this could not be. I mean, this was a stereo camera image-- it HAD to be capable of going 3-D.
It was early in the afternoon. I called the local Historical Society in Cumberland and made immediate appointment to use their period stereo-opticon viewers. The curator at 'History House" was very helpful and allowed trials with three different models.
None of these worked. Just as before, the images refused to meld together into 3-D.
Back at my studio, I pulled out the stereo and looked at it. Eventually, it dawned upon me that there was only one recourse.With uncertainty fighting against desperation, I retrieved my exacto knife. I looked at my costly stereo; then at my knife; then the stereo....
Mind made up, I positioned a straight edge down the lighter blurry center line and made the separating cut.
Arranging the two images again, but this time in reverse, I easily achieved 3-D with my viewer. The young sharpshooter appeared before me in another realm-- the third dimension! He was still laid out in those black and white tones of death; but at least NOW I could see him with a certain level of reality not available with the standard one-eyed shots.
Only much later did I learn there is a bit of a secret involved in getting your printed LOC stereos to work. You see, the glass plate image provided by the LOC are not formated to allow 3-D effects. Due to the set-up of the olden stereo cameras, the 2 images are actually reversed: the left hand image appears on the right of the glass plate negative, and the right hand image on the left. This means a direct print from the original negative cannot be placed in a stereo-opticon viewer and viewed. Instead, the print must be cut apart, then reversed. They then also require a bit of formatting through alignment. It's easy, though.
A stereo anomaly
As it is visually presented, this stereo is in pretty rough shape. Take a good gander at it and you will see it looks to have been through a hard battle, itself. It is dark and somber, sections over-exposed, others, underexposed. Very oddly, one full side of the stereo is very soft focus. I haven't seen every stereo the photographers made during their stay on the field, but, as of yet, I have not perceived this one-sided off-focus in any others taken; leastways not in the central image-areas-- which is the primary area where camera-focusing would have been performed before taking the shot. Interestingly, the other stereos show good contrast and clearer images than the Home stereo. Fact is, some are so clear they often rival the large format plate camera-work I can easily say Gardner and crew possessed a fine stereo camera.
Also, note the white-out sky as an attempt to re-introduce some contrast into an overall heavily-greyed shot. As mentioned in the last update, taking photos OF photos has this unpleasant side effect. Everything loses contrast. The brightest skies and the blackest shadows become grey. Most other detail is lost to midtones. As you can tell, Gardner --or his assistants-- clumsily painted a light-blocking coating over the sky area in an attempt to re-introduce a high-keyed whiteness to the image. Based on the visual evidence, I think it obvious the "Home" stereo, like the large format camera "Home" negative, are remakes and not the original negatives made at the battlefield.
Having read through the 2004 update, you will be aware of Gardner's attempts to hide a certain rock, i.e., to turn it into a pant-leg. The artist even drew in a 'shoe' outline and trouser-seam in his attempt to fool the viewer. Thankfully, hats off to the high-resolution LOC scan, Gardner's clever touch-up work is yet detectable by the careful eye.
Gardner also tried his artistry on this stereo. If you are one capable of achieving the 3-D effect with the sliding details shown above, then you will agree this stereo image presents that tell-tale rock in full visual depth. The rock rises above the trouser leg "nest". It seems Gardner did mess some with this stereo-- as he did with that full-sized plate image. But any and all attempts at foolery with the stereo image turned out much tougher to perform. In fact, it's nearly impossible, for you see, drawing seam lines and inserting other detail with a pencil will not destroy the 3-D effect.
There is no doubt the stereo camera used by Gardner and crew had a much smaller image format than their large plate camera. Due to this smaller size, attempts at retouching the glass plates or the printed images would be difficult. They managed to insert a couple of pencil lines in their first printout-- this to indicate that false seam line in the paints and rock. Then they re-shot the touched-up photo to create a whole new stereo glass plate. You can make out their artistic handiwork in the details at the top. You should see the 'seam-line' matches closely with the retouched full plate image discussed in the 2004 update. Not a bad job, really.... EXCEPT you can also make out the true pants seam where it intersects with the rock's nesting edge, causing that right-angle in the otherwise circular 'nest' surounding the rock. [If you need any help in finding it, the real seam is very apparent in location when viewing the pant-leg in the downhill stereo. Use it carefully for comparison.]
As for the softened focus on the left-side image, this may represent Gardner's final attempt to thwart scrutiny. Who can say? Yet it is very odd that one side of this stereo is blurry. Anyway, it still works. That rock rises straight up and the top of the trousers recedes behind it.
Make one up and show all your friends.
The Third Dimension
Whomever or Whatever made us, gave us two eyes. This is a wonderful design as it allows us to comprehend depth. We can see relative distance between objects in the world around us. A stereo camera does the same. It uses two lenses positioned a few inches apart and creates two images instead of one. Whoever it was who first thought of this truly was a grand thinker. Fact is, you can make a stereo assemblage by taking a regular 'one-eyed' camera and shooting something; then moving the camera over a few inches and taking another shot. After downloading/development and printing, the two shots can be arranged side-by-side, and, with a viewer, you'll have a true working stereo image. You may have to play with the sizes of your prints to get the whole image to pop into 3-D; but, really, no matter the size, at least some parts of your photos-- when aligned together properly-- will show the 3-D depth (as exampled by the two details above, top).
You don't think Gardner or his assistants doctored images?
The following image is the left side of another Library of Congress-owned stereo made near the Plum Run "Pond" site. Notice the large sawn log at the lower right. See the whited-out rectangular section? That area has been cleverly doctored to look like the matching counterpart to the split base of the background tree stump (near the top and just right of center).
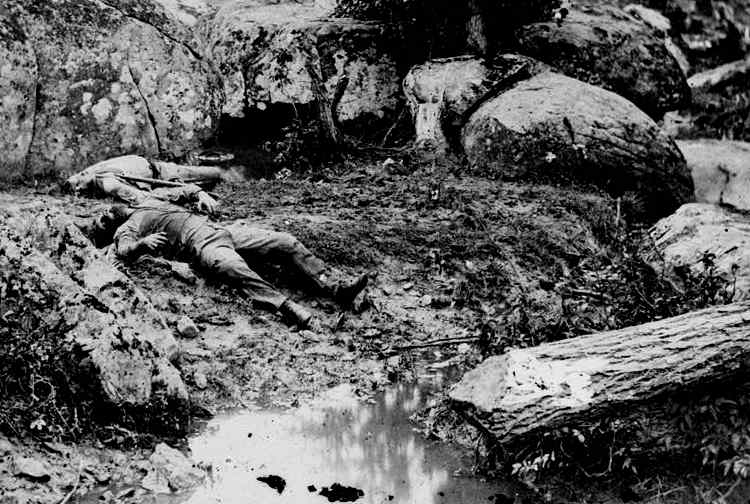
Apparently, Gardner-- or whoever-- wants us to see a connection between this log and that stump. I personally believe the attempt is to show us the log originated at that stump; and that this was the result of a Captain Smith Parrott shell hitting both that tree and the split rock next to it-- the detonation killing the two brave souls. If you find this stereo on the LOC website, you will see that BOTH right and left stereo images have been doctored to show this split-off effect. Now, if you then compare these doctored images to an older original version of this photo, such as is shown in William Frassanito's "Gettysburg; Then & Now", page23, or "Early Photography at Gettysburg", page 280, you will easily discern the fakery. According to the true originals, only bark is visible at the base of the sawn trunk.
Understand, this is a smaller-format stereo image under scrutiny; and that someone--likely Gardner-- encountered no major problem effecting the retouch in both sides of the stereo; and so, YES, the early photographers could and did alter their images.
The Patterned Blanket
In the summer of 2005, I attended an exhibit of 19th C. Coverlets at the Gilchrist Museum of the Arts in Downtown Cumberland. I was rather amazed and completely delighted to see that several of the coverlets bore resenblance to the 'patterned blanket' so easily seen in the true right-side stereo image. I was introduced by Curator Gary Bartik to Melissa Zonger, who had lent the coverlets for the exhibition. Mrs. Zonger and her husband are Pennsylvania collectors who own and trade in many such coverlets. This form of loom art was well-developed during the 19th century and the blankets were often made by individuals rather than mass-produced, by use of punch cards attached onto the home looms. The patterns were usually introduced by means of a dark red, brown, blue, or green woven in against a lighter background. I corresponded with Mrs. Zonger on several later ocasions. She easily confirmed the patterned blanket in the famous stereo was none other than a 19th C. coverlet. Among other things, she informed me these thin but tough woolen coverlets were often called into use as ground-cover at pic-nics.
James C. Groves -Frostburg, Maryland, June 2006
Click here to visit our Gallery home page.