Butterfly Edging #324 Needle tatted.
Worked by Carolyn Groves November 2001
R Ring + join
C Chain - picot
cl Close -- long picot
rw Reverse Work lj lock join
Head R 10--6--10, cl.
Body C 6-12, cl. R 6-6, cl. C 12-6, cl. Join to head.
Wings C 6, join to p on body chain.
R 7-6-5-5-5-6-7, cl. R 6+5-5-5-6, cl. (join to picot of previous
ring). Lj to p on body.
C 12, join to base of ring on body. C 12, Join to p on body chain.
R 6-5-5-5-6, cl. R 7+6+5-5-5-6-7, cl. (join to picot of previous
ring). Lj to p on body.
C 6, cl. Join to base of head. Rw.
Outer-Wing C6, cl. Join to 2nd p on first ring.
C 3-3-3, cl. Join to next p. C3-3-3-3, cl, Join to next p.
C3-3-3, cl, join to next p.
C 4, cl, join to p between rings. C 3-3-3, cl, join to next
p. C 3-3-3-3, cl, join to next p. C 3-3-3, cl, join to next
p. C4 join to p on body chain. Join to p on body chain
(opposite side). C4, join to next p. C 3-3-3, cl, join to
next p.
C 3-3-3-3, cl, join to next p. C 3-3-3, cl,
join to p between rings. C 4, cl, join to
next p. C 3-3-3, cl, join to next p. C 3-3-3-3, cl, join to next p. C 3-3-3, cl, join
to next p. C 6, join to base of head. Tie
& cut.
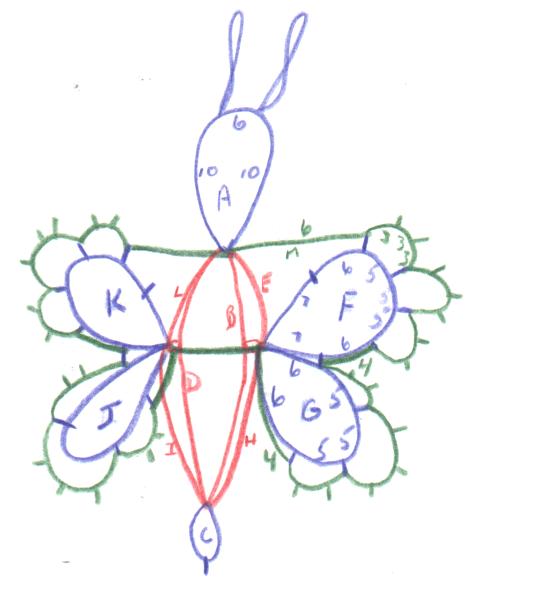 For those who don't like the above short hand pattern
style, I've attempted to do a graphic pattern. Please excuse my lack of drawing skills! My husband is the
artist in this family! This may be helpful in following the written pattern. Rings are in blue, red is the body chain and green is the Outside row of chains. I've numbered the stitches on the right side, just mirror image for the left.
For those who don't like the above short hand pattern
style, I've attempted to do a graphic pattern. Please excuse my lack of drawing skills! My husband is the
artist in this family! This may be helpful in following the written pattern. Rings are in blue, red is the body chain and green is the Outside row of chains. I've numbered the stitches on the right side, just mirror image for the left.
 When Georgia asked for volunteers to work up an antique pattern I
decided to jump in. Normally I work a lot of Workbasket patterns and
some older "10-cent" book patterns. However, this one is a real doozy!
My first read through the pattern left me really scratching my head. No
mention of rings or chains or reversing work. I figured I would start
working the pattern trying to follow the text. My first attempt didn't
turn out too bad; even though I later discovered I got the pattern wrong!
When Georgia asked for volunteers to work up an antique pattern I
decided to jump in. Normally I work a lot of Workbasket patterns and
some older "10-cent" book patterns. However, this one is a real doozy!
My first read through the pattern left me really scratching my head. No
mention of rings or chains or reversing work. I figured I would start
working the pattern trying to follow the text. My first attempt didn't
turn out too bad; even though I later discovered I got the pattern wrong!
For the second attempt I decided to play with the pattern. I made the
body in zig-zag stitch and still made the same mistake as in the first
version. In both 1 and 2 I did the bottom ring after the first wing was
formed. Doing it this way, I read the pattern as having a mistake at the
end. It finally dawned on me that when the pattern called for shuttle use
a ring was made, when "second thread" was used a chain was done.
As they say, "third time's the charm". For some reason the pattern
suddenly popped out at me. I saw the ring for the head, a chain, then
ring, then chain. Then the right wing rings, second body chains and left
wing. Then came the outer row. I worked the first half then sat there
really puzzled. I understood the directions but my modern tatting mind
just didn't want to do that strange cross over join!


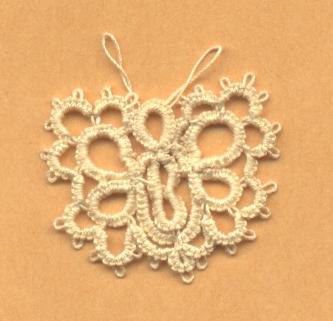
Then I just had to play! The left butterfly
has a 25 mm silver bugle in the center. I did
the bottom ring, threaded the bugle, did the
head, then did the second chains for the body
attaching them to the bugle.
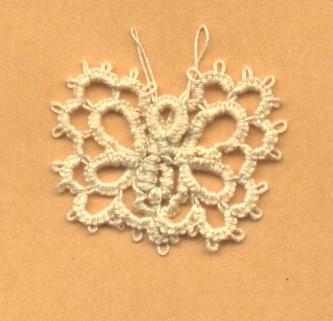
The right butterfly has a crocheted body. I
did the bottom ring, chained 12, then worked
a row of sc down one side, up the other encapsulating the extra thread on the second row. Then
Re-threaded my needle and worked the second body chain and wings as called for in the pattern.
Working up these models from the antique pattern gave me a greater appreciation of our modern
standard patterns! I'm so glad the current designers stick to the same terminology and provide a
"terms" list with their patterns!
mdtatter@yahoo.com