 This lovely little doily appeared in the
August 1918 Needlecraft magazine as Water-set in Tatting
and Crochet.
This lovely little doily appeared in the
August 1918 Needlecraft magazine as Water-set in Tatting
and Crochet.
August 1918 Needlecraft Magazine
Tatted and Crocheted Doily
Reworked and re-written by Carolyn Groves April 2004
This lovely little doily appeared in the
August 1918 Needlecraft magazine as Water-set in Tatting
and Crochet.
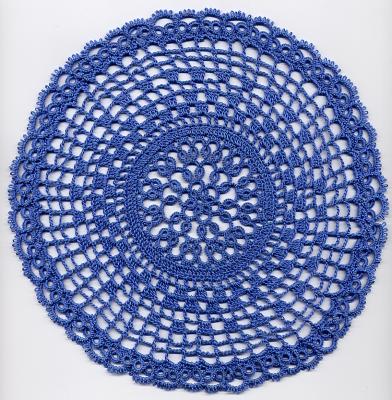
There is an important note to consider before working this doily. Tatting patterns are fairly straight forward. Our only problem is getting through the wordy and sometimes vague description of the item. Crochet patterns are an entirely different matter. Prior to 1929 crochet directions were not consistent. Both the English and American system of nomenclature were used and often it was difficult to tell which way a pattern was written. English double crochet is American single crochet; English treble crochet is American double crochet. Many times one has to closely examine the pattern to determine which standard was used. For this pattern I actually worked the first round of crochet before realizing it was English. Fortunately crochet rips out easily!
The blue doily was worked in Orin Bayen 50 (a ball of thread I received in a Christmas exchange). It measures 7.5 inches across. I used a size 12 crochet hook for the crocheted portion of the doily.
Because this doily is both Tatted and Crocheted there may be come confusion with abbreviations. See Crochet and Tatting Terms for clarification.
Tatted Rounds
Rnd 1: R 6--6, cl. rw. *C 4-2-2-4, cl, rw. *R 6+6, cl, rw. . Repeat from * 4 more times.
SC 4/2-2-4.
Rnd 2: SR 6/6, cl, rw. *C 4-2-2-4, cl, rw. R 6+6. Repeat from * around joining rings in first
and 3rd picot of chain of previous round. Last Chain is a SC 4/2-2-4.
Rnd 3: repeat Rnd 2. Join last chain to first ring. Tie and cut. (Work a normal chain as the last
chain of round 3).
To make a larger doily Round 2 can be repeated several more times. See the original directions
for suggestions to prevent rippling of work as you increase size.
Filet Crochet rounds
Rnd 4: Attach thread in first picot of chain, SC in second and third picot. *C 1, SC in next 3
picots. Repeat from * around. Join last chain 1 to first picot.
Rnd 5: C 3, *DC in each SC, 2 DC in C 1 space. Repeat from * around. Join to 3rd ch of first
C 3.
Rnd 6: C 4. *skip 1 DC, DC in next stitch, C 2. Repeat from * around. Join to 3rd C of C4.
Rnd 7: C 3, 3 DC in C1 space, C 2, *skip next space, 4 DC in next space. Repeat from * around.
Rnd 8: C 5. Skip first 3 DC, * 4 DC in next space, C 2, skip next space. Repeat from * around.
Rnd 9: C 6. * Dc in last DC of 4DC block, C 3, DC in first DC of next 4DC block, C3.. Repeat from * around. Join to 3rd chain of C6.
Rnd 10: C 3. 3 DC in Space *C 3, skip 1 space, 4 DC in next space. Repeat from * around.
Rnd 11: C 7. * DC in last DC of 4DC block, C 4, DC in first DC of next 4DC block, C 4. Repeat from * around. Join to 3rd ch of C7.
Rnd 12: C7. *DC in next DC, C 4. Repeat from * around. Join to 3rd C of C7.
Rnd 13: C8. *DC in next DC, C 5. Repeat from * around. Join to 3rd C of C8.
Rnd 14: C 1 *SC in DC, 5SC in chain sp. Repeat from * around. Join to first SC. Cut.
Tatted Border
*R: 8-4+4, cl. (Join to SC on Rnd 14), R 4+4-8, cl, rw (join to 5th SC). C 3-2-2-2-2-2-2-3, cl, rw.
Repeat from * around. Skip 4 or 5 Single crochets between joins. Adjust joining point to avoid
cupping or rippling.
This pattern is a very easy way to incorporate crochet with tatting. The flexibility of the pattern gives us the ability to create a small or large doily. I hope you enjoy working this pattern as much as I did!
Send me your comments